This document describes how to view, grant, and revoke access controls for BigQuery datasets and for the resources within datasets: tables, views, and routines. Although models are also dataset-level resources, you cannot grant access to individual models using IAM roles.
You can grant access to Google Cloud resources by using allow policies, also known as Identity and Access Management (IAM) policies, which are attached to resources. You can attach only one allow policy to each resource. The allow policy controls access to the resource itself, as well as any descendants of that resource that inherit the allow policy.
For more information on allow policies, see Policy structure in the IAM documentation.
This document assumes familiarity with the Identity and Access Management (IAM) in Google Cloud.
Limitations
- Routine access control lists (ACLs) aren't included in replicated routines.
- Routines inside external or linked datasets don't support access controls.
- Tables inside external or linked datasets don't support access controls.
- Routine access controls can't be set with Terraform.
- Routine access controls can't be set with the Google Cloud SDK.
- Routine access controls can't be set using the BigQuery data control language (DCL).
- Data Catalog doesn't support routine access controls. If a user has conditionally granted routine-level access, they won't see their routines in the BigQuery side panel. As a workaround, grant dataset-level access instead.
- The
INFORMATION_SCHEMA.OBJECT_PRIVILEGESview doesn't show access controls for routines.
Before you begin
Grant Identity and Access Management (IAM) roles that give users the necessary permissions to perform each task in this document.
Required roles
To get the permissions that
you need to modify IAM policies for resources,
ask your administrator to grant you the
BigQuery Data Owner (roles/bigquery.dataOwner)
IAM role on the project.
For more information about granting roles, see Manage access to projects, folders, and organizations.
This predefined role contains the permissions required to modify IAM policies for resources. To see the exact permissions that are required, expand the Required permissions section:
Required permissions
The following permissions are required to modify IAM policies for resources:
-
To get a dataset's access policy:
bigquery.datasets.get -
To set a dataset's access policy:
bigquery.datasets.update -
To get a dataset's access policy (Google Cloud console only):
bigquery.datasets.getIamPolicy -
To set a dataset's access policy (console only):
bigquery.datasets.setIamPolicy -
To get a table or view's policy:
bigquery.tables.getIamPolicy -
To set a table or view's policy:
bigquery.tables.setIamPolicy -
To get a routine's access policy:
bigquery.routines.getIamPolicy -
To set a routine's access policy:
bigquery.routines.setIamPolicy -
To create bq tool or SQL BigQuery jobs (optional):
bigquery.jobs.create
You might also be able to get these permissions with custom roles or other predefined roles.
Work with dataset access controls
You can provide access to a dataset by granting an IAM principal a predefined or custom role that determines what the principal can do with the dataset. This is also known as attaching an allow policy to a resource. After granting access, you can view the dataset's access controls, and you can revoke access to the dataset.
Grant access to a dataset
You can't grant access to a dataset when you create it using the BigQuery web UI or
the bq command-line tool. You must create the dataset first and then grant access to it.
The API lets you grant access during dataset creation by calling the
datasets.insert method
with a defined dataset resource.
A project is the parent resource for a dataset, and a dataset is the parent resource for tables and views, routines, and models. When you grant a role at the project level, the role and its permissions are inherited by the dataset and by the dataset's resources. Similarly, when you grant a role at the dataset level, the role and its permissions are inherited by the resources within the dataset.
You can provide access to a dataset by granting an IAM role permission to access the dataset or by conditionally granting access using an IAM condition. For more information on granting conditional access, see Control access with IAM Conditions.
To grant an IAM role access to a dataset without using conditions, select one of the following options:
Console
Go to the BigQuery page.
In the left pane, click Explorer:

If you don't see the left pane, click Expand left pane to open the pane.
In the Explorer pane, expand your project, click Datasets, and then select a dataset.
Click Sharing > Permissions.
Click Add principal.
In the New principals field, enter a principal.
In the Select a role list, select a predefined role or a custom role.
Click Save.
To return to the dataset info, click Close.
SQL
To grant principals access to datasets, use the
GRANT DCL statement:
In the Google Cloud console, go to the BigQuery page.
In the query editor, enter the following statement:
GRANT `ROLE_LIST`
ON SCHEMA RESOURCE_NAME
TO "USER_LIST"
Replace the following:
ROLE_LIST: a role or list of comma-separated roles that you want to grantRESOURCE_NAME: the name of the dataset that you're granting access toUSER_LIST: a comma-separated list of users that the role is granted toFor a list of valid formats, see
user_list.
Click Run.
For more information about how to run queries, see Run an interactive query.
The following example grants the BigQuery Data Viewer role to myDataset:
GRANT `roles/bigquery.dataViewer`
ON SCHEMA `myProject`.myDataset
TO "user:user@example.com", "user:user2@example.com"
bq
-
In the Google Cloud console, activate Cloud Shell.
At the bottom of the Google Cloud console, a Cloud Shell session starts and displays a command-line prompt. Cloud Shell is a shell environment with the Google Cloud CLI already installed and with values already set for your current project. It can take a few seconds for the session to initialize.
To write the existing dataset information (including access controls) to a JSON file, use the
bq showcommand:bq show \ --format=prettyjson \ PROJECT_ID:DATASET > PATH_TO_FILE
Replace the following:
- PROJECT_ID: your project ID
- DATASET: the name of your dataset
- PATH_TO_FILE: the path to the JSON file on your local machine
Make changes to the
accesssection of the JSON file. You can add to any of thespecialGroupentries:projectOwners,projectWriters,projectReaders, andallAuthenticatedUsers. You can also add any of the following:userByEmail,groupByEmail, anddomain.For example, the
accesssection of a dataset's JSON file would look like the following:{ "access": [ { "role": "READER", "specialGroup": "projectReaders" }, { "role": "WRITER", "specialGroup": "projectWriters" }, { "role": "OWNER", "specialGroup": "projectOwners" }, { "role": "READER", "specialGroup": "allAuthenticatedUsers" }, { "role": "READER", "domain": "domain_name" }, { "role": "WRITER", "userByEmail": "user_email" }, { "role": "READER", "groupByEmail": "group_email" } ], ... }
When your edits are complete, use the
bq updatecommand and include the JSON file using the--sourceflag. If the dataset is in a project other than your default project, add the project ID to the dataset name in the following format:PROJECT_ID:DATASET.bq update
--source PATH_TO_FILE
PROJECT_ID:DATASETTo verify your access control changes, use the
bq showcommand again without writing the information to a file:bq show --format=prettyjson PROJECT_ID:DATASET
Terraform
Use the
google_bigquery_dataset_iam resources to update
access to a dataset.
Set the access policy for a dataset
The following example shows how to use the
google_bigquery_dataset_iam_policy resource
to set the IAM policy for the
mydataset dataset. This replaces any existing policy already attached
to the dataset:
# This file sets the IAM policy for the dataset created by
# https://github.com/terraform-google-modules/terraform-docs-samples/blob/main/bigquery/bigquery_create_dataset/main.tf.
# You must place it in the same local directory as that main.tf file,
# and you must have already applied that main.tf file to create
# the "default" dataset resource with a dataset_id of "mydataset".

data "google_iam_policy" "iam_policy" {
  binding {
    role = "roles/bigquery.admin"
    members = [
      "user:user@example.com",
    ]
  }
  binding {
    role = "roles/bigquery.dataOwner"
    members = [
      "group:data.admin@example.com",
    ]
  }
  binding {
    role = "roles/bigquery.dataEditor"
    members = [
      "serviceAccount:bqcx-1234567891011-12a3@gcp-sa-bigquery-condel.iam.gserviceaccount.com",
    ]
  }
}

resource "google_bigquery_dataset_iam_policy" "dataset_iam_policy" {
  dataset_id  = google_bigquery_dataset.default.dataset_id
  policy_data = data.google_iam_policy.iam_policy.policy_data
}
Set role membership for a dataset
The following example shows how to use the
google_bigquery_dataset_iam_binding resource
to set membership in a given role for the
mydataset dataset. This replaces any existing membership in that role.
Other roles within the IAM policy for the dataset
are preserved:
# This file sets membership in an IAM role for the dataset created by
# https://github.com/terraform-google-modules/terraform-docs-samples/blob/main/bigquery/bigquery_create_dataset/main.tf.
# You must place it in the same local directory as that main.tf file,
# and you must have already applied that main.tf file to create
# the "default" dataset resource with a dataset_id of "mydataset".

resource "google_bigquery_dataset_iam_binding" "dataset_iam_binding" {
  dataset_id = google_bigquery_dataset.default.dataset_id
  role       = "roles/bigquery.jobUser"

  members = [
    "user:user@example.com",
    "group:group@example.com"
  ]
}
Set role membership for a single principal
The following example shows how to use the
google_bigquery_dataset_iam_member resource
to update the IAM policy for the
mydataset dataset to grant a role to one principal. Updating this
IAM policy does not affect access for any other principals
that have been granted that role for the dataset.
# This file adds a member to an IAM role for the dataset created by
# https://github.com/terraform-google-modules/terraform-docs-samples/blob/main/bigquery/bigquery_create_dataset/main.tf.
# You must place it in the same local directory as that main.tf file,
# and you must have already applied that main.tf file to create
# the "default" dataset resource with a dataset_id of "mydataset".

resource "google_bigquery_dataset_iam_member" "dataset_iam_member" {
  dataset_id = google_bigquery_dataset.default.dataset_id
  role       = "roles/bigquery.user"
  member     = "user:user@example.com"
}
To apply your Terraform configuration in a Google Cloud project, complete the steps in the following sections.
Prepare Cloud Shell
- Launch Cloud Shell.
-
Set the default Google Cloud project where you want to apply your Terraform configurations.
You only need to run this command once per project, and you can run it in any directory.
export GOOGLE_CLOUD_PROJECT=PROJECT_ID
Environment variables are overridden if you set explicit values in the Terraform configuration file.
Prepare the directory
Each Terraform configuration file must have its own directory (also called a root module).
-
In Cloud Shell, create a directory and a new
file within that directory. The filename must have the
.tfextension—for examplemain.tf. In this tutorial, the file is referred to asmain.tf.mkdir DIRECTORY && cd DIRECTORY && touch main.tf
-
If you are following a tutorial, you can copy the sample code in each section or step.
Copy the sample code into the newly created
main.tf.Optionally, copy the code from GitHub. This is recommended when the Terraform snippet is part of an end-to-end solution.
- Review and modify the sample parameters to apply to your environment.
- Save your changes.
-
Initialize Terraform. You only need to do this once per directory.
terraform init
Optionally, to use the latest Google provider version, include the
-upgradeoption:terraform init -upgrade
Apply the changes
-
Review the configuration and verify that the resources that Terraform is going to create or
update match your expectations:
terraform plan
Make corrections to the configuration as necessary.
-
Apply the Terraform configuration by running the following command and entering
yesat the prompt:terraform apply
Wait until Terraform displays the "Apply complete!" message.
- Open your Google Cloud project to view the results. In the Google Cloud console, navigate to your resources in the UI to make sure that Terraform has created or updated them.
API
To apply access controls when the dataset is created, call the
datasets.insert method
with a defined
dataset resource.
To update your access controls, call the
datasets.patch method and
use the access property in the Dataset resource.
Because the datasets.update method replaces the entire dataset resource,
datasets.patch is the preferred method for updating access controls.
Go
Before trying this sample, follow the Go setup instructions in the BigQuery quickstart using client libraries. For more information, see the BigQuery Go API reference documentation.
To authenticate to BigQuery, set up Application Default Credentials. For more information, see Set up authentication for client libraries.
Set the new access list by appending the new entry to the existing list withDatasetMetadataToUpdate type
. Then call the
dataset.Update() function to update the property.
Java
Before trying this sample, follow the Java setup instructions in the BigQuery quickstart using client libraries. For more information, see the BigQuery Java API reference documentation.
To authenticate to BigQuery, set up Application Default Credentials. For more information, see Set up authentication for client libraries.
Node.js
Before trying this sample, follow the Node.js setup instructions in the BigQuery quickstart using client libraries. For more information, see the BigQuery Node.js API reference documentation.
To authenticate to BigQuery, set up Application Default Credentials. For more information, see Set up authentication for client libraries.
Set the new access list by appending the new entry to the existing list using the Dataset#metadata method. Then call the Dataset#setMetadata() function to update the property.Python
Before trying this sample, follow the Python setup instructions in the BigQuery quickstart using client libraries. For more information, see the BigQuery Python API reference documentation.
To authenticate to BigQuery, set up Application Default Credentials. For more information, see Set up authentication for client libraries.
Set thedataset.access_entries property
with the access controls for a dataset. Then call the
client.update_dataset() function to update the property.
Predefined roles that grant access to datasets
You can grant the following IAM predefined roles access to a dataset.
| Role | Description |
|---|---|
BigQuery Data Owner
(roles/bigquery.dataOwner) |
When granted on a dataset, this role grants these permissions:
|
BigQuery Data Editor
(roles/bigquery.dataEditor) |
When granted on a dataset, this role grants these permissions:
|
BigQuery Data Viewer
(roles/bigquery.dataViewer) |
When granted on a dataset, this role grants these permissions:
|
BigQuery Metadata Viewer
(roles/bigquery.metadataViewer) |
When granted on a dataset, this role grants these permissions:
|
Dataset permissions
Most permissions that begin with bigquery.datasets apply at the dataset level.
bigquery.datasets.create doesn't. In order to create datasets,
bigquery.datasets.create permission must be granted to a role on the parent
container–the project.
The following table lists all permissions for datasets and the lowest-level resource the permission can be applied to.
| Permission | Resource | Action |
|---|---|---|
bigquery.datasets.create |
Project | Create new datasets in the project. |
bigquery.datasets.get |
Dataset | Get metadata and access controls for the dataset. Viewing permissions in
the console also requires the
bigquery.datasets.getIamPolicy permission. |
bigquery.datasets.getIamPolicy |
Dataset | Required by the console to grant the user permission to get a dataset's
access controls. Fails open. The console also requires the
bigquery.datasets.get permission to view the dataset. |
bigquery.datasets.update |
Dataset | Update metadata and access controls for the dataset. Updating access
controls in the console also requires the
bigquery.datasets.setIamPolicy permission.
|
bigquery.datasets.setIamPolicy |
Dataset | Required by the console to grant the user permission to set a dataset's
access controls. Fails open. The console also requires the
bigquery.datasets.update permission to update the dataset. |
bigquery.datasets.delete |
Dataset | Delete a dataset. |
bigquery.datasets.createTagBinding |
Dataset | Attach tags to the dataset. |
bigquery.datasets.deleteTagBinding |
Dataset | Detach tags from the dataset. |
bigquery.datasets.listTagBindings |
Dataset | List tags for the dataset. |
bigquery.datasets.listEffectiveTags |
Dataset | List effective tags (applied and inherited) for the dataset. |
bigquery.datasets.link |
Dataset | Create a linked dataset. |
bigquery.datasets.listSharedDatasetUsage |
Project | List shared dataset usage statistics for datasets that you have access
to in the project. This permission is required to query the
INFORMATION_SCHEMA.SHARED_DATASET_USAGE view. |
View access controls for a dataset
You can view the explicitly set access controls for a dataset by choosing one of the following options. To view inherited roles, for a dataset, use the BigQuery web UI.
Console
Go to the BigQuery page.
In the left pane, click Explorer:
In the Explorer pane, expand your project, click Datasets, and then select a dataset.
Click Sharing > Permissions.
The dataset's access controls appear in the Dataset Permissions pane.
bq
-
In the Google Cloud console, activate Cloud Shell.
At the bottom of the Google Cloud console, a Cloud Shell session starts and displays a command-line prompt. Cloud Shell is a shell environment with the Google Cloud CLI already installed and with values already set for your current project. It can take a few seconds for the session to initialize.
To get an existing policy and output it to a local file in JSON, use the
bq showcommand in Cloud Shell:bq show \ --format=prettyjson \ PROJECT_ID:DATASET > PATH_TO_FILE
Replace the following:
- PROJECT_ID: your project ID
- DATASET: the name of your dataset
- PATH_TO_FILE: the path to the JSON file on your local machine
SQL
Query the INFORMATION_SCHEMA.OBJECT_PRIVILEGES view.
Queries to retrieve access controls for a dataset must specify the
object_name.
In the Google Cloud console, go to the BigQuery page.
In the query editor, enter the following statement:
SELECT
COLUMN_LIST
FROM
  PROJECT_ID.`region-REGION`.INFORMATION_SCHEMA.OBJECT_PRIVILEGES
WHERE
object_name = "DATASET";
Replace the following:
- COLUMN_LIST: a comma-separated list of columns from the
INFORMATION_SCHEMA.OBJECT_PRIVILEGESview - PROJECT_ID: your project ID
- REGION: a region qualifier
- DATASET: the name of a dataset in your project
- COLUMN_LIST: a comma-separated list of columns from the
Click Run.
For more information about how to run queries, see Run an interactive query.
Example:
This query gets access controls for mydataset.
SELECT
object_name, privilege_type, grantee
FROM
my_project.`region-us`.INFORMATION_SCHEMA.OBJECT_PRIVILEGES
WHERE
object_name = "mydataset";
The output should look like the following:
+------------------+-----------------------------+-------------------------+
|   object_name    |  privilege_type             | grantee                 |
+------------------+-----------------------------+-------------------------+
| mydataset        | roles/bigquery.dataOwner    | projectOwner:myproject  |
| mydataset        | roles/bigquery.dataViwer    | user:user@example.com   |
+------------------+-----------------------------+-------------------------+
API
To view the access controls for a dataset, call the
datasets.get
method with a defined
dataset resource.
The access controls appear in the access property of the dataset resource.
Go
Before trying this sample, follow the Go setup instructions in the BigQuery quickstart using client libraries. For more information, see the BigQuery Go API reference documentation.
To authenticate to BigQuery, set up Application Default Credentials. For more information, see Set up authentication for client libraries.
Call theclient.Dataset().Metadata() function. The access policy is available in the Access property.
Java
Before trying this sample, follow the Java setup instructions in the BigQuery quickstart using client libraries. For more information, see the BigQuery Java API reference documentation.
To authenticate to BigQuery, set up Application Default Credentials. For more information, see Set up authentication for client libraries.
Node.js
Before trying this sample, follow the Node.js setup instructions in the BigQuery quickstart using client libraries. For more information, see the BigQuery Node.js API reference documentation.
To authenticate to BigQuery, set up Application Default Credentials. For more information, see Set up authentication for client libraries.
Retrieve the dataset metadata using theDataset#getMetadata() function.
The access policy is available in the access property of the resulting metadata object.
Python
Before trying this sample, follow the Python setup instructions in the BigQuery quickstart using client libraries. For more information, see the BigQuery Python API reference documentation.
To authenticate to BigQuery, set up Application Default Credentials. For more information, see Set up authentication for client libraries.
Call theclient.get_dataset() function.
The access policy is available in the
dataset.access_entries property.
Revoke access to a dataset
To revoke access to a dataset, select one of the following options:
Console
Go to the BigQuery page.
In the left pane, click Explorer:
In the Explorer pane, expand your project, click Datasets, and then select a dataset.
In the details panel, click Sharing > Permissions.
In the Dataset Permissions dialog, expand the principal whose access you want to revoke.
Click Remove principal.
In the Remove role from principal? dialog, click Remove.
To return to dataset details, click Close.
SQL
To remove a principal's access to a dataset, use the
REVOKE DCL statement:
In the Google Cloud console, go to the BigQuery page.
In the query editor, enter the following statement:
REVOKE `ROLE_LIST`
ON SCHEMA RESOURCE_NAME
FROM "USER_LIST"
Replace the following:
ROLE_LIST: a role or list of comma-separated roles that you want to revokeRESOURCE_NAME: the name of the resource that you want to revoke permission onUSER_LIST: a comma-separated list of users who will have their roles revokedFor a list of valid formats, see
user_list.
Click Run.
For more information about how to run queries, see Run an interactive query.
The following example revokes the BigQuery Data Owner role from myDataset:
REVOKE `roles/bigquery.dataOwner`
ON SCHEMA `myProject`.myDataset
FROM "group:group@example.com", "serviceAccount:user@test-project.iam.gserviceaccount.com"
bq
-
In the Google Cloud console, activate Cloud Shell.
At the bottom of the Google Cloud console, a Cloud Shell session starts and displays a command-line prompt. Cloud Shell is a shell environment with the Google Cloud CLI already installed and with values already set for your current project. It can take a few seconds for the session to initialize.
To write the existing dataset information (including access controls) to a JSON file, use the
bq showcommand:bq show \ --format=prettyjson \ PROJECT_ID:DATASET > PATH_TO_FILE
Replace the following:
- PROJECT_ID: your project ID
- DATASET: the name of your dataset
- PATH_TO_FILE: the path to the JSON file on your local machine
Make changes to the
accesssection of the JSON file. You can remove any of thespecialGroupentries:projectOwners,projectWriters,projectReaders, andallAuthenticatedUsers. You can also remove any of the following:userByEmail,groupByEmail, anddomain.For example, the
accesssection of a dataset's JSON file would look like the following:{ "access": [ { "role": "READER", "specialGroup": "projectReaders" }, { "role": "WRITER", "specialGroup": "projectWriters" }, { "role": "OWNER", "specialGroup": "projectOwners" }, { "role": "READER", "specialGroup": "allAuthenticatedUsers" }, { "role": "READER", "domain": "domain_name" }, { "role": "WRITER", "userByEmail": "user_email" }, { "role": "READER", "groupByEmail": "group_email" } ], ... }
When your edits are complete, use the
bq updatecommand and include the JSON file using the--sourceflag. If the dataset is in a project other than your default project, add the project ID to the dataset name in the following format:PROJECT_ID:DATASET.bq update
--source PATH_TO_FILE
PROJECT_ID:DATASETTo verify your access control changes, use the
showcommand without writing the information to a file:bq show --format=prettyjson PROJECT_ID:DATASET
API
Call the datasets.patch method
and use the access property in the Dataset resource to update your access
controls.
Because the datasets.update method replaces the entire dataset resource,
datasets.patch is the preferred method for updating access controls.
Go
Before trying this sample, follow the Go setup instructions in the BigQuery quickstart using client libraries. For more information, see the BigQuery Go API reference documentation.
To authenticate to BigQuery, set up Application Default Credentials. For more information, see Set up authentication for client libraries.
Set the new access list by removing the entry from the existing list withDatasetMetadataToUpdate type
. Then call the
dataset.Update() function to update the property.
Java
Before trying this sample, follow the Java setup instructions in the BigQuery quickstart using client libraries. For more information, see the BigQuery Java API reference documentation.
To authenticate to BigQuery, set up Application Default Credentials. For more information, see Set up authentication for client libraries.
Node.js
Before trying this sample, follow the Node.js setup instructions in the BigQuery quickstart using client libraries. For more information, see the BigQuery Node.js API reference documentation.
To authenticate to BigQuery, set up Application Default Credentials. For more information, see Set up authentication for client libraries.
Update the dataset access list by removing the specified entry from the existing list using theDataset#get()
method to retrieve the current metadata. Modify the access property to exclude the desired entity, and then call the
Dataset#setMetadata()
function to apply the updated access list.
Python
Before trying this sample, follow the Python setup instructions in the BigQuery quickstart using client libraries. For more information, see the BigQuery Python API reference documentation.
To authenticate to BigQuery, set up Application Default Credentials. For more information, see Set up authentication for client libraries.
Set thedataset.access_entries property with the access controls for a dataset. Then call the
client.update_dataset() function to update the property.
Work with table and view access controls
Views are treated as table resources in BigQuery. You can provide access to a table or view by granting an IAM principal a predefined or custom role that determines what the principal can do with the table or view. This is also known as attaching an allow policy to a resource. After granting access, you can view the access controls for the table or view, and you can revoke access to the table or view.
Grant access to a table or view
For fine-grained access control, you can grant a predefined or custom IAM role on a specific table or view. The table or view also inherits access controls specified at the dataset level and higher. For example, if you grant a principal the BigQuery Data Owner role on a dataset, that principal also has BigQuery Data Owner permissions on the tables and views in the dataset.
To grant access to a table or view, select one of the following options:
Console
Go to the BigQuery page.
In the left pane, click Explorer:
In the Explorer pane, expand your project, click Datasets, and then select a dataset.
Click Overview > Tables, and then click a table or a view.
Click Share > Manage permissions.
Click Add principal.
In the New principals field, enter a principal.
In the Select a role list, select a predefined role or a custom role.
Click Save.
To return to the table or view details, click Close.
SQL
To grant principals access to tables or views, use the
GRANT DCL statement:
In the Google Cloud console, go to the BigQuery page.
In the query editor, enter the following statement:
GRANT `ROLE_LIST`
ON RESOURCE_TYPE RESOURCE_NAME
TO "USER_LIST"
Replace the following:
ROLE_LIST: a role or list of comma-separated roles that you want to grantRESOURCE_TYPE: the type of resource that the role is applied toSupported values include
TABLE,VIEW,MATERIALIZED VIEWandEXTERNAL TABLE.RESOURCE_NAME: the name of the resource that you want to grant the permission onUSER_LIST: a comma-separated list of users that the role is granted toFor a list of valid formats, see
user_list.
Click Run.
For more information about how to run queries, see Run an interactive query.
The following example grants the BigQuery Data Viewer role on myTable:
GRANT `roles/bigquery.dataViewer`
ON TABLE `myProject`.myDataset.myTable
TO "user:user@example.com", "user:user2@example.com"
bq
-
In the Google Cloud console, activate Cloud Shell.
At the bottom of the Google Cloud console, a Cloud Shell session starts and displays a command-line prompt. Cloud Shell is a shell environment with the Google Cloud CLI already installed and with values already set for your current project. It can take a few seconds for the session to initialize.
To grant access to a table or view, use the
bq add-iam-policy-bindingcommand:bq add-iam-policy-binding --member=MEMBER_TYPE:MEMBER --role=ROLE --table=true RESOURCE
Replace the following:
- MEMBER_TYPE: the type of member, such as
user,group,serviceAccount, ordomain. - MEMBER: the member's email address or domain name.
- ROLE: the role that you want to grant to the member.
- RESOURCE: the name of the table or view whose policy you want to update.
- MEMBER_TYPE: the type of member, such as
Terraform
Use the
google_bigquery_table_iam resources to update access to a table.
Set the access policy for a table
The following example shows how to use the
google_bigquery_table_iam_policy resource
to set the IAM policy for the
mytable table. This replaces any existing policy already attached
to the table:
# This file sets the IAM policy for the table created by
# https://github.com/terraform-google-modules/terraform-docs-samples/blob/main/bigquery/bigquery_create_table/main.tf.
# You must place it in the same local directory as that main.tf file,
# and you must have already applied that main.tf file to create
# the "default" table resource with a table_id of "mytable".

data "google_iam_policy" "iam_policy" {
  binding {
    role = "roles/bigquery.dataOwner"
    members = [
      "user:user@example.com",
    ]
  }
}

resource "google_bigquery_table_iam_policy" "table_iam_policy" {
  dataset_id  = google_bigquery_table.default.dataset_id
  table_id    = google_bigquery_table.default.table_id
  policy_data = data.google_iam_policy.iam_policy.policy_data
}
Set role membership for a table
The following example shows how to use the
google_bigquery_table_iam_binding resource
to set membership in a given role for the
mytable table. This replaces any existing membership in that role.
Other roles within the IAM policy for the table
are preserved.
# This file sets membership in an IAM role for the table created by
# https://github.com/terraform-google-modules/terraform-docs-samples/blob/main/bigquery/bigquery_create_table/main.tf.
# You must place it in the same local directory as that main.tf file,
# and you must have already applied that main.tf file to create
# the "default" table resource with a table_id of "mytable".

resource "google_bigquery_table_iam_binding" "table_iam_binding" {
  dataset_id = google_bigquery_table.default.dataset_id
  table_id   = google_bigquery_table.default.table_id
  role       = "roles/bigquery.dataOwner"

  members = [
    "group:group@example.com",
  ]
}
Set role membership for a single principal
The following example shows how to use the
google_bigquery_table_iam_member resource
to update the IAM policy for the
mytable table to grant a role to one principal. Updating this
IAM policy does not affect access for any other principals
that have been granted that role for the dataset.
# This file adds a member to an IAM role for the table created by
# https://github.com/terraform-google-modules/terraform-docs-samples/blob/main/bigquery/bigquery_create_table/main.tf.
# You must place it in the same local directory as that main.tf file,
# and you must have already applied that main.tf file to create
# the "default" table resource with a table_id of "mytable".

resource "google_bigquery_table_iam_member" "table_iam_member" {
  dataset_id = google_bigquery_table.default.dataset_id
  table_id   = google_bigquery_table.default.table_id
  role       = "roles/bigquery.dataEditor"
  member     = "serviceAccount:bqcx-1234567891011-12a3@gcp-sa-bigquery-condel.iam.gserviceaccount.com"
}
To apply your Terraform configuration in a Google Cloud project, complete the steps in the following sections.
Prepare Cloud Shell
- Launch Cloud Shell.
-
Set the default Google Cloud project where you want to apply your Terraform configurations.
You only need to run this command once per project, and you can run it in any directory.
export GOOGLE_CLOUD_PROJECT=PROJECT_ID
Environment variables are overridden if you set explicit values in the Terraform configuration file.
Prepare the directory
Each Terraform configuration file must have its own directory (also called a root module).
-
In Cloud Shell, create a directory and a new
file within that directory. The filename must have the
.tfextension—for examplemain.tf. In this tutorial, the file is referred to asmain.tf.mkdir DIRECTORY && cd DIRECTORY && touch main.tf
-
If you are following a tutorial, you can copy the sample code in each section or step.
Copy the sample code into the newly created
main.tf.Optionally, copy the code from GitHub. This is recommended when the Terraform snippet is part of an end-to-end solution.
- Review and modify the sample parameters to apply to your environment.
- Save your changes.
-
Initialize Terraform. You only need to do this once per directory.
terraform init
Optionally, to use the latest Google provider version, include the
-upgradeoption:terraform init -upgrade
Apply the changes
-
Review the configuration and verify that the resources that Terraform is going to create or
update match your expectations:
terraform plan
Make corrections to the configuration as necessary.
-
Apply the Terraform configuration by running the following command and entering
yesat the prompt:terraform apply
Wait until Terraform displays the "Apply complete!" message.
- Open your Google Cloud project to view the results. In the Google Cloud console, navigate to your resources in the UI to make sure that Terraform has created or updated them.
API
To retrieve the current policy, call the
tables.getIamPolicymethod.Edit the policy to add members or access controls, or both. For the format required for the policy, see the Policy reference topic.
Call
tables.setIamPolicyto write the updated policy.
Go
Before trying this sample, follow the Go setup instructions in the BigQuery quickstart using client libraries. For more information, see the BigQuery Go API reference documentation.
To authenticate to BigQuery, set up Application Default Credentials. For more information, see Set up authentication for client libraries.
Call the resource'sIAM().SetPolicy() function
to save changes to the access policy for a table or view.
Java
Before trying this sample, follow the Java setup instructions in the BigQuery quickstart using client libraries. For more information, see the BigQuery Java API reference documentation.
To authenticate to BigQuery, set up Application Default Credentials. For more information, see Set up authentication for client libraries.
Node.js
Before trying this sample, follow the Node.js setup instructions in the BigQuery quickstart using client libraries. For more information, see the BigQuery Node.js API reference documentation.
To authenticate to BigQuery, set up Application Default Credentials. For more information, see Set up authentication for client libraries.
Call theTable#getIamPolicy() function
to retrieve the current IAM policy for a table or view, modify the policy by adding new bindings, and then use
Table#setIamPolicy() function
to save changes to the access policy.
Python
Before trying this sample, follow the Python setup instructions in the BigQuery quickstart using client libraries. For more information, see the BigQuery Python API reference documentation.
To authenticate to BigQuery, set up Application Default Credentials. For more information, see Set up authentication for client libraries.
Call theclient.set_iam_policy() function
to save changes to the access policy for a table or view.
Predefined roles that grant access to tables and views
Views are treated as table resources in BigQuery. For fine-grained access control, you can grant a predefined or custom IAM role on a specific table or view. The table or view also inherits access controls specified at the dataset level and higher. For example, if you grant a principal the BigQuery Data Owner role on a dataset, that principal also has Data Owner permissions on the tables and views in the dataset.
The following predefined IAM roles have permissions on tables or views.
| Role | Description |
|---|---|
BigQuery Data Owner
(roles/bigquery.dataOwner) |
When granted on a table or view, this role grants these permissions:
|
BigQuery Data Editor
(roles/bigquery.dataEditor) |
When granted on a table or view, this role grants these permissions:
|
BigQuery Data Viewer
(roles/bigquery.dataViewer) |
When granted on a table or view, this role grants these permissions:
|
BigQuery Metadata Viewer
(roles/bigquery.metadataViewer) |
When granted on a table or view, this role grants these permissions:
|
Permissions for tables and views
Views are treated as table resources in BigQuery. All table-level permissions apply to views.
Most permissions that begin with bigquery.tables apply at the table level.
bigquery.tables.create and bigquery.tables.list don't. In order to create
and list tables or views, bigquery.tables.create and bigquery.tables.list
permissions must be granted to a role on a parent container–the dataset or the
project.
The following table lists all permissions for tables and views and the lowest-level resource they can be granted to.
| Permission | Resource | Action |
|---|---|---|
bigquery.tables.create |
Dataset | Create new tables in the dataset. |
bigquery.tables.createIndex |
Table | Create a search index on the table. |
bigquery.tables.deleteIndex |
Table | Delete a search index on the table. |
bigquery.tables.createSnapshot |
Table | Create a snapshot of the table. Creating a snapshot requires several additional permissions at the table and dataset level. For details, see Permissions and roles for creating table snapshots. |
bigquery.tables.deleteSnapshot |
Table | Delete a snapshot of the table. |
bigquery.tables.delete |
Table | Delete a table. |
bigquery.tables.createTagBinding |
Table | Create resource tag bindings on a table. |
bigquery.tables.deleteTagBinding |
Table | Delete resource tag bindings on a table. |
bigquery.tables.listTagBindings |
Table | List resource tag bindings on a table. |
bigquery.tables.listEffectiveTags |
Table | List effective tags (applied and inherited) for the table. |
bigquery.tables.export |
Table | Export the table's data. Running an extract job also requires
bigquery.jobs.create permissions. |
bigquery.tables.get |
Table | Get metadata for a table. |
bigquery.tables.getData |
Table | Query the table's data. Running a query job also requires
bigquery.jobs.create permissions. |
bigquery.tables.getIamPolicy |
Table | Get access controls for the table. |
bigquery.tables.list |
Dataset | List all tables and table metadata in the dataset. |
bigquery.tables.replicateData |
Table | Replicate table data. This permission is required for creating replica materialized views. |
bigquery.tables.restoreSnapshot |
Table | Restore a table snapshot. |
bigquery.tables.setCategory |
Table | Set policy tags in the table's schema. |
bigquery.tables.setColumnDataPolicy |
Table | Set column-level access policies on a table. |
bigquery.tables.setIamPolicy |
Table | Set access controls on a table. |
bigquery.tables.update |
Table | Update table. metadata. bigquery.tables.get is also
required to update table metadata in the console. |
bigquery.tables.updateData |
Table | Update table data. |
bigquery.tables.updateIndex |
Table | Update a search index on the table. |
View access controls for a table or view
To view the access controls for a table or view, choose one of the following options:
Console
Go to the BigQuery page.
In the left pane, click Explorer:
In the Explorer pane, expand your project, click Datasets, and then select a dataset.
Click Overview > Tables, and then click a table or a view.
Click Share.
The table or view access controls appear in the Share pane.
bq
-
In the Google Cloud console, activate Cloud Shell.
At the bottom of the Google Cloud console, a Cloud Shell session starts and displays a command-line prompt. Cloud Shell is a shell environment with the Google Cloud CLI already installed and with values already set for your current project. It can take a few seconds for the session to initialize.
To get an existing access policy and output it to a local file in JSON, use the
bq get-iam-policycommand in Cloud Shell:bq get-iam-policy \ --table=true \ PROJECT_ID:DATASET.RESOURCE > PATH_TO_FILE
Replace the following:
- PROJECT_ID: your project ID
- DATASET: the name of your dataset
- RESOURCE: the name of the table or view whose policy you want to view
- PATH_TO_FILE: the path to the JSON file on your local machine
SQL
Query the INFORMATION_SCHEMA.OBJECT_PRIVILEGES view.
Queries to retrieve access controls for a table or view must specify the
object_schema and object_name.
In the Google Cloud console, go to the BigQuery page.
In the query editor, enter the following statement:
SELECT
COLUMN_LIST
FROM
  PROJECT_ID.`region-REGION`.INFORMATION_SCHEMA.OBJECT_PRIVILEGES
WHERE
object_schema = "DATASET" AND object_name = "TABLE";
Replace the following:
- COLUMN_LIST: a comma-separated list of columns from the
INFORMATION_SCHEMA.OBJECT_PRIVILEGESview - PROJECT_ID: your project ID
- REGION: a region qualifier
- DATASET: the name of a dataset that contains the table or view
- TABLE: the name of the table or view
- COLUMN_LIST: a comma-separated list of columns from the
Click Run.
For more information about how to run queries, see Run an interactive query.
Example:
SELECT
object_name, privilege_type, grantee
FROM
my_project.`region-us`.INFORMATION_SCHEMA.OBJECT_PRIVILEGES
WHERE
object_schema = "mydataset" AND object_name = "mytable";
+------------------+-----------------------------+--------------------------+
|   object_name    |  privilege_type             | grantee                  |
+------------------+-----------------------------+--------------------------+
| mytable          | roles/bigquery.dataEditor   | group:group@example.com|
| mytable          | roles/bigquery.dataOwner    | user:user@example.com|
+------------------+-----------------------------+--------------------------+
API
To retrieve the current policy, call the
tables.getIamPolicy method.
Go
Before trying this sample, follow the Go setup instructions in the BigQuery quickstart using client libraries. For more information, see the BigQuery Go API reference documentation.
To authenticate to BigQuery, set up Application Default Credentials. For more information, see Set up authentication for client libraries.
Call the resource'sIAM().Policy() function. Then call the Roles() function to get the access policy for a table or view.
Java
Before trying this sample, follow the Java setup instructions in the BigQuery quickstart using client libraries. For more information, see the BigQuery Java API reference documentation.
To authenticate to BigQuery, set up Application Default Credentials. For more information, see Set up authentication for client libraries.
Node.js
Before trying this sample, follow the Node.js setup instructions in the BigQuery quickstart using client libraries. For more information, see the BigQuery Node.js API reference documentation.
To authenticate to BigQuery, set up Application Default Credentials. For more information, see Set up authentication for client libraries.
Retrieve the IAM policy for a table or view using theTable#getIamPolicy() function.
The access policy details are available in the returned policy object.
Revoke access to a table or view
To revoke access to a table or view, select one of the following options:
Console
Go to the BigQuery page.
In the left pane, click Explorer:
In the Explorer pane, expand your project, click Datasets, and then select a dataset.
Click Overview > Tables, and then click a table or a view.
In the details pane, click Share > Manage permissions.
In the Share dialog, expand the principal whose access you want to revoke.
Click Delete.
In the Remove role from principal? dialog, click Remove.
To return to the table or view details, click Close.
SQL
To remove access to tables or views from principals, use the
REVOKE DCL statement:
In the Google Cloud console, go to the BigQuery page.
In the query editor, enter the following statement:
REVOKE `ROLE_LIST`
ON RESOURCE_TYPE RESOURCE_NAME
FROM "USER_LIST"
Replace the following:
ROLE_LIST: a role or list of comma-separated roles that you want to revokeRESOURCE_TYPE: the type of resource that the role is revoked fromSupported values include
TABLE,VIEW,MATERIALIZED VIEWandEXTERNAL TABLE.RESOURCE_NAME: the name of the resource that you want to revoke permission onUSER_LIST: a comma-separated list of users who will have their roles revokedFor a list of valid formats, see
user_list.
Click Run.
For more information about how to run queries, see Run an interactive query.
The following example revokes the BigQuery Data Owner role on myTable:
REVOKE `roles/bigquery.dataOwner`
ON TABLE `myProject`.myDataset.myTable
FROM "group:group@example.com", "serviceAccount:user@myproject.iam.gserviceaccount.com"
bq
-
In the Google Cloud console, activate Cloud Shell.
At the bottom of the Google Cloud console, a Cloud Shell session starts and displays a command-line prompt. Cloud Shell is a shell environment with the Google Cloud CLI already installed and with values already set for your current project. It can take a few seconds for the session to initialize.
To revoke access to a table or view, use the
bq remove-iam-policy-bindingcommand:bq remove-iam-policy-binding --member=MEMBER_TYPE:MEMBER --role=ROLE --table=true RESOURCE
Replace the following:
- MEMBER_TYPE: the type of member, such as
user,group,serviceAccount, ordomain - MEMBER: the member's email address or domain name
- ROLE: the role that you want to revoke from the member
- RESOURCE: the name of the table or view whose policy you want to update
- MEMBER_TYPE: the type of member, such as
API
To retrieve the current policy, call the
tables.getIamPolicymethod.Edit the policy to remove members or bindings, or both. For the format required for the policy, see the Policy reference topic.
Call
tables.setIamPolicyto write the updated policy.
Go
Before trying this sample, follow the Go setup instructions in the BigQuery quickstart using client libraries. For more information, see the BigQuery Go API reference documentation.
To authenticate to BigQuery, set up Application Default Credentials. For more information, see Set up authentication for client libraries.
Call thepolicy.Remove() function
to remove the access.
Then call the
IAM().SetPolicy() function
to save changes to the access policy for a table or view.
Java
Before trying this sample, follow the Java setup instructions in the BigQuery quickstart using client libraries. For more information, see the BigQuery Java API reference documentation.
To authenticate to BigQuery, set up Application Default Credentials. For more information, see Set up authentication for client libraries.
Node.js
Before trying this sample, follow the Node.js setup instructions in the BigQuery quickstart using client libraries. For more information, see the BigQuery Node.js API reference documentation.
To authenticate to BigQuery, set up Application Default Credentials. For more information, see Set up authentication for client libraries.
Retrieve the current IAM policy for a table or view using theTable#getIamPolicy() method.
Modify the policy to remove the desired role or principal, and then apply the updated policy using the
Table#setIamPolicy() method.
Work with access controls for routines
To provide feedback or request support for this feature, email bigquery-security@google.com.
You can provide access to a routine by granting an IAM principal a predefined or custom role that determines what the principal can do with the routine. This is also known as attaching an allow policy to a resource. After granting access, you can view the access controls for the routine, and you can revoke access to the routine.
Grant access to a routine
For fine-grained access control, you can grant a predefined or custom IAM role on a specific routine. The routine also inherits access controls specified at the dataset level and higher. For example, if you grant a principal the BigQuery Data Owner role on a dataset, that principal also has Data Owner permissions on the routines in the dataset.
Select one of the following options:
Console
Go to the BigQuery page.
In the left pane, click Explorer:
In the Explorer pane, expand your project, click Datasets, and then select a dataset.
Go to the Routines tab and click a routine.
Click Share.
Click Add members.
In the New members field, enter a principal.
In the Select a role list, select a predefined role or a custom role.
Click Save.
To return to the routine info, click Done.
bq
-
In the Google Cloud console, activate Cloud Shell.
At the bottom of the Google Cloud console, a Cloud Shell session starts and displays a command-line prompt. Cloud Shell is a shell environment with the Google Cloud CLI already installed and with values already set for your current project. It can take a few seconds for the session to initialize.
To write the existing routine information (including access controls) to a JSON file, use the
bq get-iam-policycommand:bq get-iam-policy \ PROJECT_ID:DATASET.ROUTINE \ > PATH_TO_FILE
Replace the following:
- PROJECT_ID: your project ID
- DATASET: the name of the dataset that contains the routine that you want to update
- ROUTINE: the name of the resource to update
- PATH_TO_FILE: the path to the JSON file on your local machine
Make changes to the
bindingssection of the JSON file. A binding binds one or more principals to a singlerole. Principals can be user accounts, service accounts, Google groups, and domains. For example, thebindingssection of a routine's JSON file would look like the following:{ "bindings": [ { "role": "roles/bigquery.dataViewer", "members": [ "user:user@example.com", "group:group@example.com", "domain:example.com", ] }, ], "etag": "BwWWja0YfJA=", "version": 1 }
To update the access policy, use the
bq set-iam-policycommand:bq set-iam-policy PROJECT_ID:DATASET.ROUTINE PATH_TO_FILE
To verify your access control changes, use the
bq get-iam-policycommand again without writing the information to a file:bq get-iam-policy --format=prettyjson \\ PROJECT_ID:DATASET.ROUTINE
API
To retrieve the current policy, call the
routines.getIamPolicymethod.Edit the policy to add principals, bindings, or both. For the format required for the policy, see the Policy reference topic.
Call
routines.setIamPolicyto write the updated policy.
Predefined roles that grant access to routines
For fine-grained access control, you can grant a predefined or custom IAM role on a specific routine. The routine also inherits access controls specified at the dataset level and higher. For example, if you grant a principal the Data Owner role on a dataset, that principal also has Data Owner permissions on the routines in the dataset through inheritance.
The following predefined IAM roles have permissions on routines.
| Role | Description |
|---|---|
BigQuery Data Owner
(roles/bigquery.dataOwner) |
When granted on a routine, this role grants these permissions:
You shouldn't grant the Data Owner role at the routine level. Data Editor also grants all permissions for the routine and is a less permissive role. |
BigQuery Data Editor
(roles/bigquery.dataEditor) |
When granted on a routine, this role grants these permissions:
|
BigQuery Data Viewer
(roles/bigquery.dataViewer) |
When granted on a routine, this role grants these permissions:
|
BigQuery Metadata Viewer
(roles/bigquery.metadataViewer) |
When granted on a routine, this role grants these permissions:
|
Permissions for routines
Most permissions that begin with bigquery.routines apply at the routine level.
bigquery.routines.create and bigquery.routines.list don't. In order to
create and list routines, bigquery.routines.create and
bigquery.routines.list permissions must be granted to a role on the parent
container–the dataset.
The following table lists all permissions for routines and the lowest-level resource they can be granted to.
| Permission | Resource | Description |
|---|---|---|
bigquery.routines.create |
Dataset | Create a routine in the dataset. This permission also requires
bigquery.jobs.create to run a query job that contains a
CREATE FUNCTION statement. |
bigquery.routines.delete |
Routine | Delete a routine. |
bigquery.routines.get |
Routine | Reference a routine created by someone else. This permission also
requires bigquery.jobs.create to run a query job that
references the routine, and you also need permission to access any resources
that the routine references, such as tables or views. |
bigquery.routines.list |
Dataset | List routines in the dataset and show metadata for routines. |
bigquery.routines.update |
Routine | Update routine definitions and metadata. |
bigquery.routines.getIamPolicy |
Routine | Get access controls for the routine. |
bigquery.routines.setIamPolicy |
Routine | Set access controls for the routine. |
View the access controls for a routine
To view the access controls for a routine, choose one of the following options:
Console
Go to the BigQuery page.
In the left pane, click Explorer:
In the Explorer pane, expand your project, click Datasets, and then select a dataset.
Go to the Routines tab and click a routine.
Click Share.
The routine's access controls appear in the Share pane.
bq
The bq get-iam-policy command does not provide support for viewing access
controls on a routine.
SQL
The
INFORMATION_SCHEMA.OBJECT_PRIVILEGES view
doesn't show access controls for routines.
API
To retrieve the current policy, call the
routines.getIamPolicy method.
Revoke access to a routine
To revoke access to a routine, select one of the following options:
Console
Go to the BigQuery page.
In the left pane, click Explorer:
In the Explorer pane, expand your project, click Datasets, and then select a dataset.
Go to the Routines tab and click a routine.
In the details pane, click Share > Permissions.
In the Routine Permissions dialog, expand the principal whose access you want to revoke.
Click Remove principal.
In the Remove role from principal? dialog, click Remove.
Click Close.
bq
-
In the Google Cloud console, activate Cloud Shell.
At the bottom of the Google Cloud console, a Cloud Shell session starts and displays a command-line prompt. Cloud Shell is a shell environment with the Google Cloud CLI already installed and with values already set for your current project. It can take a few seconds for the session to initialize.
To write the existing routine information (including access controls) to a JSON file, use the
bq get-iam-policycommand:bq get-iam-policy --routine PROJECT_ID:DATASET.ROUTINE > PATH_TO_FILE
Replace the following:
- PROJECT_ID: your project ID
- DATASET: the name of the dataset that contains the routine that you want to update
- ROUTINE: the name of the resource to update
- PATH_TO_FILE: the path to the JSON file on your local machine
In the policy file, the value for
versionremains1. This number refers to the IAM policy schema version, not the version of the policy. The value foretagvalue is the policy version number.Make changes to the
accesssection of the JSON file. You can remove any of thespecialGroupentries:projectOwners,projectWriters,projectReaders, andallAuthenticatedUsers. You can also remove any of the following:userByEmail,groupByEmail, anddomain.For example, the
accesssection of a routine's JSON file would look like the following:{ "bindings": [ { "role": "roles/bigquery.dataViewer", "members": [ "user:user@example.com", "group:group@example.com", "domain:google.com", ] }, ], "etag": "BwWWja0YfJA=", "version": 1 }
To update the access policy, use the
bq set-iam-policycommand:bq set-iam-policy --routine PROJECT_ID:DATASET.ROUTINE PATH_TO_FILE
To verify your access control changes, use the
get-iam-policycommand again without writing the information to a file:bq get-iam-policy --routine --format=prettyjson PROJECT_ID:DATASET.ROUTINE
API
To retrieve the current policy, call the
routines.getIamPolicymethod.Edit the policy to add principals or bindings, or both. For the format required for the policy, see the Policy reference topic.
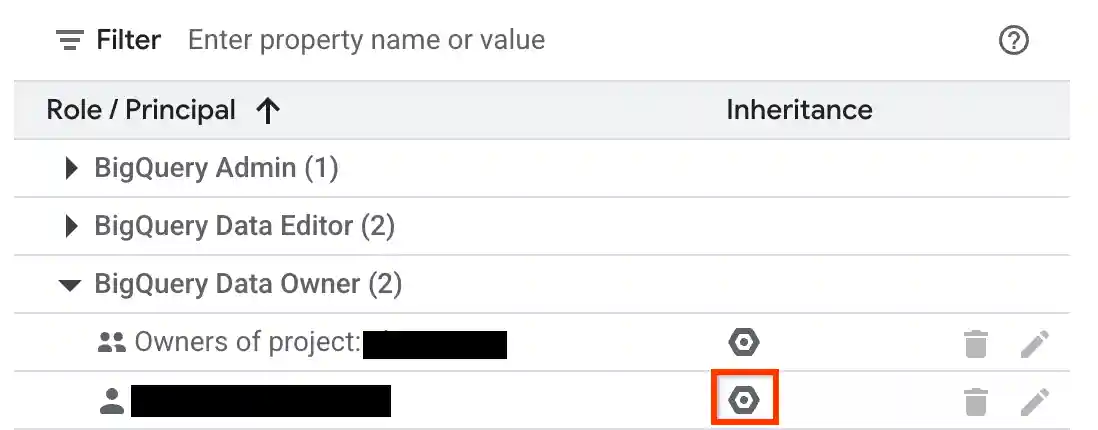
View inherited access controls for a resource
You can examine the inherited IAM roles for a resource by using the BigQuery web UI. You'll need the appropriate permissions to view inheritance in the console. To examine inheritance for a dataset, table, view, or routine:
In the Google Cloud console, go to the BigQuery page.
In the left pane, click Explorer:
In the Explorer pane, expand your project, click Datasets, and then select a dataset, or select a table, view, or routine in the dataset.
Click Share > Manage permissions.
Verify that the Show inherited roles in table option is enabled.
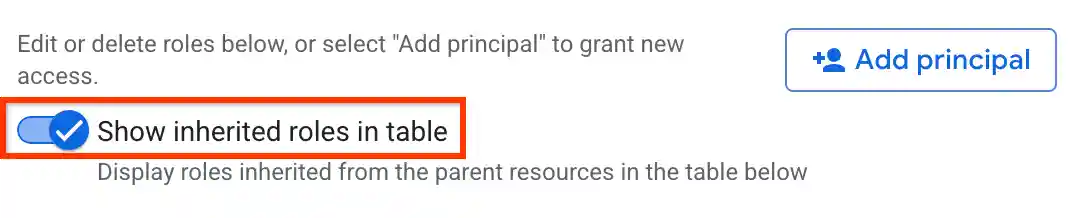
Expand a role in the table.
In the Inheritance column, the hexagonal icon indicates whether the role was inherited from a parent resource.
Deny access to a resource
IAM deny policies let you set guardrails on access to BigQuery resources. You can define deny rules that prevent selected principals from using certain permissions, regardless of the roles they're granted.
For information about how to create, update, and delete deny policies, see Deny access to resources.
Special cases
Consider the following scenarios when you create IAM deny policies on a few BigQuery permissions:
Access to authorized resources (views, routines, datasets, or stored procedures) lets you create, drop, or manipulate a table, along with reading and modifying table data, even if you don't have direct permission to perform those operations. It can also get model data or metadata and invoke other stored procedures on the underlying table. This capability implies that the authorized resources have the following permissions:
bigquery.tables.getbigquery.tables.listbigquery.tables.getDatabigquery.tables.updateDatabigquery.tables.createbigquery.tables.deletebigquery.routines.getbigquery.routines.listbigquery.datasets.getbigquery.models.getDatabigquery.models.getMetadata
To deny access to these authorized resources, add one of the following values to the
deniedPrincipalfield when you create the deny policy:Value Use case principalSet://goog/public:allBlocks all principals including authorized resources. principalSet://bigquery.googleapis.com/projects/PROJECT_NUMBER/*Blocks all BigQuery authorized resources in the specified project. PROJECT_NUMBERis an automatically generated unique identifier for your project of typeINT64.To exempt certain principals from the deny policy, specify those principals in the
exceptionPrincipalsfield of your deny policy. For example,exceptionPrincipals: "principalSet://bigquery.googleapis.com/projects/1234/*".BigQuery caches query results of a job owner for 24 hours, which the job owner can access without needing the
bigquery.tables.getDatapermission on the table containing the data. Hence, adding an IAM deny policy to thebigquery.tables.getDatapermission doesn't block access to cached results for the job owner until the cache expires. To block the job owner access to cached results, create a separate deny policy on thebigquery.jobs.createpermission.To prevent unintended data access when using deny policies to block data read operations, we recommend that you also review and revoke any existing subscriptions on the dataset.
To create a IAM deny policy for viewing dataset access controls, deny the following permissions:
bigquery.datasets.getbigquery.datasets.getIamPolicy
To create a IAM deny policy for updating dataset access controls, deny the following permissions:
bigquery.datasets.updatebigquery.datasets.setIamPolicy
What's next
Learn how to use the
projects.testIamPermissions method
to test user access to a resource.