A fully configurable proxy in NodeJS, which can handle HTTPS requests perfectly.
wiki - 代理服务器的新轮子 ,介绍我们为什么要再造一个代理服务器,anyproxy与众不同的结构与功能。

(Chinese in this doc is nothing but translation of some key points. Be relax if you dont understand.)
Feature
- work as http or https proxy
- fully configurable, you can modify a request at any stage by your own javascript code
- when working as https proxy, it can generate and intercept https requests for any domain without complaint by browser (after you trust its root CA)
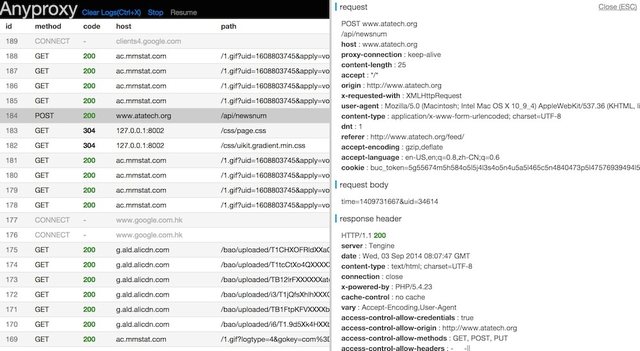
- a web interface is availabe for you to view request details
- (beta)a web UI interface for you to replace some remote response with local data
Usage
step 1 - install
- install NodeJS
npm install -g anyproxy, may requiresudo- python is optional, it will be OK if you get some error about it during installing.
step 2 - start server
- start with default settings :
anyproxy - start with a specific port:
anyproxy --port 8001 - start with a rule file:
anyproxy --rule ./rule_sample/rule_allow_CORS.js
step 3 - launch web interface
- visit http://127.0.0.1:8002 with modern browsers
Rule module
- with customized rule module, you may hack an http request at any stage, no matter it's just before sending or after servers' responding.
- actually ruleFile.js is a module for Nodejs, feel free to invoke your own modules and logic. You may get the entire scheme via rule__blank.js.
- to invoke your rule file:
anyproxy --rule /path/to/ruleFile.js - the following figure explains the whole procedure of an http request, and the corresponding functions in rule module
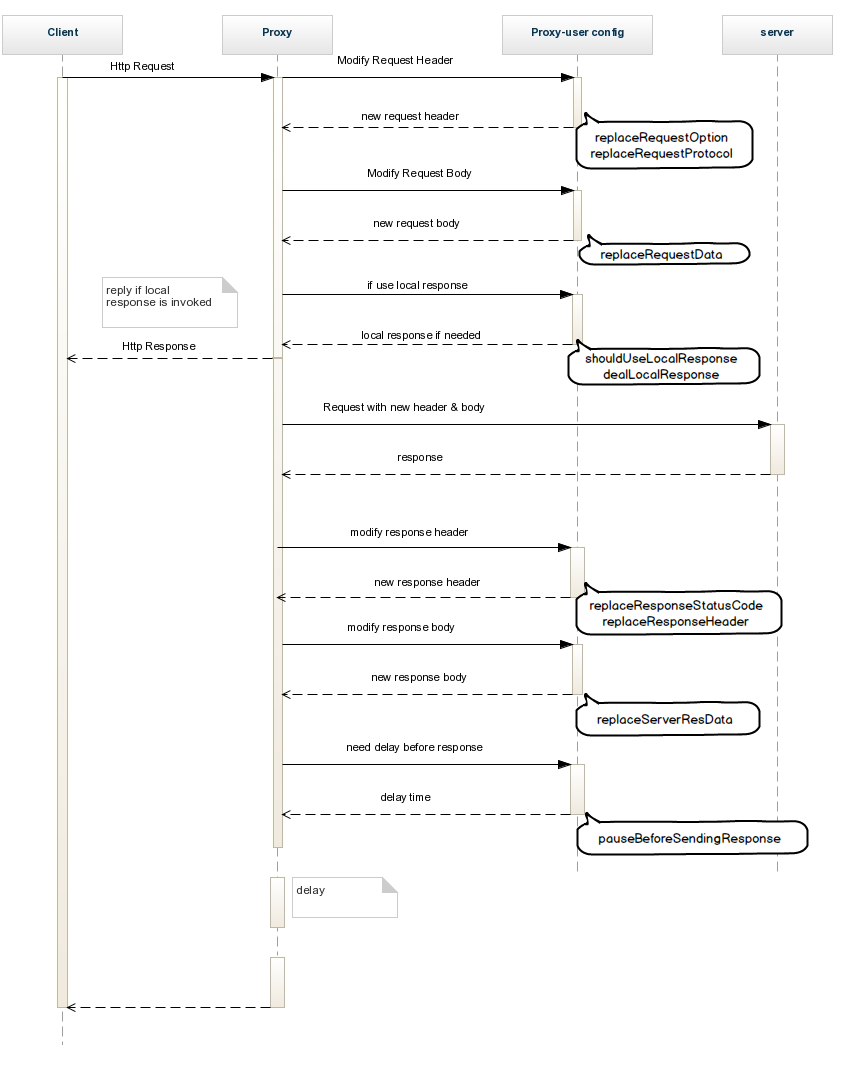
-
here we also provide some samples in ./rule_sample
-
sample list
- rule__blank.js,
- blank rule file with some comments. You may read this before writing your own rule file.
- 空白的规则文件模板,和一些注释
- rule_adjust_response_time.js
- delay all the response for 1500ms
- 把所有的响应延迟1500毫秒
- rule_allow_CORS.js
- add CORS headers to allow cross-domain ajax request
- 为ajax请求增加跨域头
- rule_intercept_some_https_requests.js
- intercept https requests toward github.com and append some data
- 截获github.com的https请求,再在最后加点文字
- rule_remove_cache_header.js
- remove all cache-related headers from server
- 去除响应头里缓存相关的头
- rule_replace_request_option.js
- replace request parameters before sending to the server
- 在请求发送到服务端前对参数做一些调整
- rule_replace_response_data.js
- modify response data
- 修改响应数据
- rule_replace_response_status_code.js
- replace server's status code
- 改变服务端响应的http状态码
- rule_use_local_data.js
- map some requests to local file
- 把图片响应映射到本地
- rule__blank.js,
-
and here is the scheme in rule module
module.exports = {
    summary:function(){
        return "this is a blank rule for anyproxy";
    },


    //=======================
    //when getting a request from user
    //收到用户请求之后
    //=======================

    //是否在本地直接发送响应(不再向服务器发出请求)
    //whether to intercept this request by local logic
    //if the return value is true, anyproxy will call dealLocalResponse to get response data and will not send request to remote server anymore
    shouldUseLocalResponse : function(req,reqBody){
        return false;
    },

    //如果shouldUseLocalResponse返回true,会调用这个函数来获取本地响应内容
    //you may deal the response locally instead of sending it to server
    //this function be called when shouldUseLocalResponse returns true
    //callback(statusCode,resHeader,responseData)
    //e.g. callback(200,{"content-type":"text/html"},"hello world")
    dealLocalResponse : function(req,reqBody,callback){
        callback(statusCode,resHeader,responseData)
    },


    //=======================
    //when ready to send a request to server
    //向服务端发出请求之前
    //=======================

    //替换向服务器发出的请求协议(http和https的替换)
    //replace the request protocol when sending to the real server
    //protocol : "http" or "https"
    replaceRequestProtocol:function(req,protocol){
        var newProtocol = protocol;
        return newProtocol;
    },

    //替换向服务器发出的请求参数(option)
    //req is user's request which will be sent to the proxy server, docs : http://nodejs.org/api/http.html#http_http_request_options_callback
    //you may return a customized option to replace the original option
    //you should not write content-length header in options, since anyproxy will handle it for you
    replaceRequestOption : function(req,option){
        var newOption = option;
        return newOption;
    },

    //替换请求的body
    //replace the request body
    replaceRequestData: function(req,data){
        return data;
    },

    //=======================
    //when ready to send the response to user after receiving response from server
    //向用户返回服务端的响应之前
    //=======================

    //替换服务器响应的http状态码
    //replace the statusCode before it's sent to the user
    replaceResponseStatusCode: function(req,res,statusCode){
        var newStatusCode = statusCode;
        return newStatusCode;
    },

    //替换服务器响应的http头
    //replace the httpHeader before it's sent to the user
    //Here header == res.headers
    replaceResponseHeader: function(req,res,header){
        var newHeader = header;
        return newHeader;
    },

    //替换服务器响应的数据
    //replace the response from the server before it's sent to the user
    //you may return either a Buffer or a string
    //serverResData is a Buffer, you may get its content by calling serverResData.toString()
    replaceServerResDataAsync: function(req,res,serverResData,callback){
        callback(serverResData);
    },
    //replaceServerResData is deprecated

    //在请求返回给用户前的延迟时间
    //add a pause before sending response to user
    pauseBeforeSendingResponse : function(req,res){
        var timeInMS = 1; //delay all requests for 1ms
        return timeInMS;
    },

    //=======================
    //https config
    //=======================

    //是否截获https请求
    //should intercept https request, or it will be forwarded to real server
    shouldInterceptHttpsReq :function(req){
        return false;
    }

};
Using https features
step 1 - install openssl
- openssl is availabe here : http://wiki.openssl.org/index.php/Compilation_and_Installation
- using
openssl version -ato make sure it is accessible via you command line.
step 2 - generate a rootCA and trust it
- you should do this when it is the first time to start anyproxy
- execute
sudo anyproxy --root,follow the instructions on screen - *[important!]you will see some tip like rootCA generated at : ~/.anyproxy_certs... .
cdto that directory, add/trust the rootCA.crt file to your system keychain. In OSX, you may do that by open the crt file directly - when debug https requests, you have to trust this rootCA on all of your clients.
to intercept(decrypt) https requests
- start your anyproxy as normal. When rootCA is generated, it will intercept all the https requests for you automatically.
- if you get a warning like 'unsafe connection', please check if the root CA is correctly trusted .
to start an https proxy
anyproxy --type https --host my.domain.com- the param
hostis required with https proxy and it should be kept exactly what it it when you config your browser. Otherwise, you may get some warning about security. - using https proxy means your request towards proxy will be encrypted. Please notice that this feature has nothing to do with intercept https requests.
about certs
- root certs and temperary certs are stored at
path.join(util.getUserHome(),"/.anyproxy_certs/") - to get the rootCA.crt file , you may either find it in local dir or download it via anyproxy web interface
- to clear all the temperary certificates
anyproxy --clear - https features may be unstable in windows
Others
to save request data
- to save request data to local file, use
anyproxy --file /path/to/file - anyproxy uses nedb to save request data. Since NeDB's persistence uses an append-only format, you may get some redundant record in local file. For those dupplicated ones with the same id, just use the lastest line of record.
throttling
- e.g. throttle to 10kb/s (kbyte/sec) , use
anyproxy --throttle 10 - this is just a rough throttling for downstream, not for network simulation
work as a module for nodejs
npm install anyproxy --save
var proxy = require("anyproxy");

//create cert when you want to use https features
//please manually trust this rootCA when it is the first time you run it
!proxy.isRootCAFileExists() && proxy.generateRootCA();

var options = {
    type          : "http",
    port          : 8001,
    hostname      : "localhost",
    rule          : require("path/to/my/ruleModule.js"),
    dbFile        : null,  // optional, save request data to a specified file, will use in-memory db if not specified
    webPort       : 8002,  // optional, port for web interface
    socketPort    : 8003,  // optional, internal port for web socket, replace this when it is conflict with your own service
    webConfigPort : 8088,  // optional, internal port for web config(beta), replace this when it is conflict with your own service
    throttle      : 10,    // optional, speed limit in kb/s
    disableWebInterface : false //optional, set it when you don't want to use the web interface
};
new proxy.proxyServer(options);
Contact
- anyproxy用户旺旺群:1203077233
- Please feel free to raise any issue about this project, or give us some advice on this doc. :)