Use the following guidelines when contributing to this project.
Table of Contents generated with DocToc
- Get involved
- Submitting issues
- Contributing code
- Automated testing
- Packages
Get involved
There are many ways to get involved:
- Contribute to our Planning Documents
- Report bugs on our issue tracker
- Add documentation via our documentation repository
- Improve the code with pull requests
- Choose a task from our backlog
Join the discussion
- Join the Apinf Community portal - ask and answer questions, share ideas, etc.
- Hang out in the Apinf IRC chatroom (#Apinf on Freenode)
Submitting issues
There are a couple of common issue types in our tracker:
- Bug reports / support requests
- Features/enhancements
Please follow our issue guidelines, when submitting new issues.
General details
Each issue should have the following details:
- brief, descriptive title
- short overview paragraph further describing the issue
Feature/enhancement requests
Provide the following details for feature/enhancement requests:
- user story - short paragraph in the form of "As a [user role], I would like [feature/enhancement], so that [need fulfilled]"
- wireframe - simple, monochrome diagram depicting the desired user interface (in SVG or PNG format)
- acceptance criteria (simplified) - checklist of present tense statements describing how the feature behaves
Feature/enhancement request example
Add new widget to page
The page does not have a widget. Add a widget to the page.
User story
As a registered user
I need a widget on the page
so that I have something to click
Design
[Monochrome diagram of the desired design, e.g. a wireframe.]
Definition of Done
The task is complete when the following criteria are satisfied:
- Widget appears on page
- User can click on widget
Note: Some of the above details will be added during the feature discovery and planning process.
Bug reports / support requests
When submitting a bug report or support request, include the following details, if possible:
- steps to reproduce
- screenshot showing observed behavior
- description of observed behavior
- description of expected behavior
- relevant environment details (e.g. web browser, operating system, etc)
Bug report/support request example
Widget doesn't work when clicked
On the page, the widget doesn't do anything when clicked.
Steps to reproduce
- View the page
- Click the widget
Observed behavior
When clicking the widget, nothing happens.
[Optionally include a screenshot, if it is relevant.]
Expected behavior
When clicking the widget, something should happen.
Environment
- Web browser
- Operating system
Note: Some of the above details will be added during the discussion and testing process.
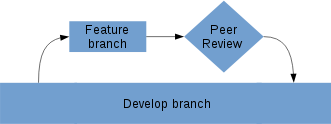
When contributing code, please follow the Gitflow guidelines. Specifically:
- Create a new feature branch from the
developbranch - Prefix your feature branch name with
/feature
Additionally, the following steps help our team stay coordinated:
- Immediately open a pull request by comparing your branch against the
developbranch - Label your pull request as
WIP, so that other developers can see the work in progress - When ready for review, @mention the development team, so that we know to review your code
Important: Getting developer feedback is part of our peer review process. It helps to highlight issues and improvements early in the process.
Branching strategy
Importance of git history
The idea behind the importance of Git history (to name a few) is that:
- A clean log allows easy tracking of project over time
- Allows using tools like
git bisectwithout any hassle - Reduces conflicts during merging the
featureorhotfixbranches todevelopbranch
Further, since we would be getting closer to supporting multiple releases and for different customers, it makes a lot of sense to have a code where backporting of minor security fixes is possible. I hope that all of us here appreciate the fact that when merging a PR or even cherry picking a security fix, the whole process should not take more than hitting enter on the relevant command. A relatively linear history allows this to happen with minimum or less hassles.
Git rebase
This comment focuses on git rebase:
One of the most powerful features of git is the ability to commit often, fix history if needed and push once done. In all the personal feature branches we should use this strategy. So, when a feature has to be developed this is what we should follow:
- Create a feature branch for all the development
- Do all the development in the feature branch
- Merge to
developonce the feature has been DONE
In a continuous development environment, there are chances that the develop will be updated before a developer finishes his/her feature. So, the following thumb rules should be applied:
- A rebase a day keeps conflicts away: These guidelines recommends to a developer that they should rebase their branch (= update your branch w.r.t. latest develop) once every morning before they start their regular work.
- A rebase must be performed before creating a PR.
An example for rebase is given below (with a new repository and using master instead of develop, apologies ;-) ).
 ^^ above:
- New repo was initiated
- Initial commit was added to master
- Feature branch
feature-01was created and completed - Assumption is that there might be new commits in
masterby the timefeature-01is finished.

^^ and there are new commits in master. We should update our feature-01 branch w.r.t. latest in master

^^ feature-01 before git rebase master

^^ Initiated git rebase master and state of the feature branch after the rebase. As you can see that the commit c59309b has been applied to feature-01 and then, the implementation of feature-01 is applied to the tree.. This is how we should follow.
Remember that at this stage, you might also get conflicts and you should resolve the conflicts here. Once the feature-01 has been updated w.r.t. master (and in our case, w.r.t. develop), then a PR must be made from feature-01 -> develop.

Github already uses a --no-ff merge strategy so, we need not worry about that.
Copyright statement in source code
All files should have a copyright statement at the top. In practise it means that if you create a new file, you need to include a copyright statement as a comment at the top of it.
Copyright 2017 Apinf Oy
This file is covered by the EUPL license.
You may obtain a copy of the licence at
https://joinup.ec.europa.eu/community/eupl/og_page/european-union-public-licence-eupl-v11
CSS styleguide
File structure:
- Each template - own style file
- Each style file - overriding section, function section
- Everything global - global.less file
Code quality
In a nutshell, write code for humans to read and understand. Our code will be minified for machines during the build process. For further reference, please read the following:
- Human JavaScript by Henrik Joreteg
- Clean Code rules for JavaScript
Simplicity and safety
When writing code, tend towards simple and explicit solutions. Avoid cleverness when possible, as it may come back to bite us.
Please read and follow the following guidelines:
Importing
Add importing statements right after the copyright notice.
The sections should be one of the below and the comments must be exactly the same text. They also should follow this order unless eslint complains about it.
- Meteor packages imports - anything imported straight from meteor
- Meteor contributed packages imports - contributed packages, like kadira:flow-router or tap:i18n
- Collection imports - all collections needed by the current file
- APInf imports - any custom file, probably from
/core - Npm packages imports - if importing packages from npm are needed
Examples below:
// Meteor packages imports
import { Template } from 'meteor/templating';

// Meteor contributed packages imports
import { FlowRouter } from 'meteor/kadira:flow-router';

// Collection imports
import ApiMetadata from '../../collection';

// APInf imports
import formatDate from '/apinf_packages/core/helper_functions/format_date';

// Npm packages imports
import _ from 'lodash';
Comments
Every significant line of code should have an accompanying human language (English) comment. Generally, comments should be placed on the line preceeding the code. This is for several reasons:
- Comments act like a pair-programmer, explaining the code to other developers or your future self
- Comments may illuminate errors
- logical errors where code is not doing what is expected
- semantic errors where the code is not literate
- Natural language is easier for the human mind to parse than computer code
- Placing comments on the preceeding line, as opposed to the end of the line, improves readability
- comment can be long, e.g. 80 characters
- comments at same level of nesting fall in-line with one another vertically
Example comment
// Try and find the missing widget
let missingWidget = Widgets.findOne({missing: true});
One task per line
Each line of code should perform only one action. When chaining is important, each chained aciton should be placed on a new line.
Chaining example
Chained methods
let pizza = new Pizza();

pizza
  .cook()
  .slice()
  .serve()
  .enjoy();
Complex line example
A complex line can be split into parts.
// Complex line
let missingWidgetCount = Widgets.find({missing: true}).fetch().length;
// Safer in parts
let missingWidgets = Widgets.find().fetch();

if (missingWidgets) {
 // Count the missing widgets
 let missingWidgetsCount = missingWidgets.length

 // Alert the boss!

}
Variables
Use semantic variable names. Semantic variable names have the following traits:
- They succinctly describe what they represent
- Words are fully spelled out
- Variables with multiple words use camel case notation
- When used in subsequent lines of code, the variable name reads as close to a plain language sentence as possible
Variable examples
Here are some not so meaningful variable names:
// Stuff to eat (somewhat healthy)
let array1 = ["pizza slice", "yogurt", "strawberries"];

// Stuff to disgard
let array2 = ["tattered shoe", "broken pencil", "crumpled paper"];

// Things might get confusing later on
eat(array2);
disgard(array1);
Meaningful variable names carry their meaning through the code.
// Stuff to eat
let food = ["pizza slice", "yohgurt", "strawberries"];

// Stuff to disgard
let trash = ["tattered shoe", "broken pencil", "crumpled paper"];

// Now it all makes sense!
eat(food);
disgard(trash);
Code standard(s) and Lint
eslint is configured to run on every commit on Continuous Integration server.
The project is configured with the Airbnb styleguide and meteor recommendation for eslint.
To run locally, do:
Indentation
Indent all HTML(Blaze) and JavaScript code with two spaces for each level of nesting.
Also, nest most/all HTML child elements -- i.e. avoid having multiple inline elements.
<p>
  <!-- nesting is important for readability -->
  <!-- e.g. when adding long internationalization keys -->
  Paragraph text.
</p>
Quotes
Please use quotation marks ("" and '') consistently. In general,
- use single quotes in JavaScript
- e.g. 'here is a string'
- use single quotes in handlebars
- e.g.
{{_ 'i18n_token' }}
- e.g.
- use double quotes in HTML
- e.g.
<a href="...">Link</a>
- e.g.
Whitespace
Please use consistent whitespace in project files. In general, whitespace is used to help people read our code.
- use two spaces for indentation in HTML and JavaScript files
Handlebars helpers
Please observe the following structure when working with handlebars syntax:
- Handlebars (
{{) and prefixes (>,#,/, and_) should be placed next to each other.- Examples:
{{> ... }},{{# ... }},{{/ ... }},{{_ ... }}
- Examples:
- include a space before the closing handlebars
}}- Example:
{{ ... }}
- Example:
- use spaces on both sides of handlebars words
- Examples:
{{# if }},{{ else }},{{_ 'i18n_token' }}
- Examples:
File structure
This project is organized around a 'module' / 'component' architecture.
By 'module', we mean anything that has it's own database collection and one or more routes. Components are more closely related to the idea of WebComponents, which are intended to be reusable, hierarchical user interface elements. Modules are located in the project root, with components in the client sub-directory.
In general, our module structure follows this pattern:
- /module_name
- client/
- component_one/
- component_one.css
- component_one.html
- component_one.js
- sub_component/
- sub_component.css
- sub_component.html
- sub_component.js
- lib/
- router.js
- component_one/
- collection/
- index.js
- schema.js
- permissions.js
- helpers.js
- server/
- publications.js
- server/
- methods.js
- client/
File names
Please use underscores in folder and file names, rather than hyphens or camel case. E.g.
folder_name/file_name.css
folder_name/file_name.html
folder_name/file_name.js
Collection/Schema structure
After some trial and error, we have settled on the following pattern for defining collections and schemas:
// inside 'component/collection/index.js'

// Define collection name variable with corresponding MongoDB collection name in camelCase
const CollectionName = new Mongo.Collection("collectionName");

// Export the collection
export { CollectionName };
Next, we need to attach a schema to the collection, for validation, etc.
// inside 'component/collection/schema.js'

// Import the collection using relative path
import { CollectionName } from './';

// Define the collection schema, by attaching a 'schema' property
CollectionName.schema = new SimpleSchema({
  // Schema field definitions
});

// Allow collection internationalization
CollectionName.schema.i18n("schemas.collection_name");

// Attach schema to collection for validation, etc.
CollectionName.attachSchema(CollectionName.schema);
Explicit required fields
When defining schemas, we need to designate some fields as required or optional. By default if we do not designate a field as required or optional, it will be implicitly required.
Following the guideline of explicit is better than implicit, all fields should be explicitly defined as required or optional:
// Schema object
requiredField : {
  ...
  optional: false
},
optionalField: {
  ...
  optional: true
}
Schema changes
To make upgrading convenient & keep application database consistent we want to have a proper data migration path for the application.
As a developer, provide a proper migration step in your PR if you make changes to any collection schema structure.
Location for migrations is under /core/migrations/server/
Steps:
- Add a new file for migration, format (migration-version-number)-(short-migration-name).js
- Write migration function for 'up' step
Example migration step:
Migrations.add({
  version: 1,
  name: 'Adds pants to all people in the db.',
  up () {
    // code to migrate up to version 1
    // Add pants to all people that don't have.
  }
});
We are using percolate:migrations package for migrations. For additional info check README.
References:
- Meteor Guide: Code Style - Collections
- Meteor Guide: Collections and Schemas
Internationalization (i18n)
To the extent possible, all user-facing text should be internationalized. To add internationalization support for texts, we use the following conventions.
i18n key structure
Internationalization keys in our project use the following elements, separated by underscores
templateName- the name of the template as it appears in either:- the
<template name="templateName"> - the
{{# AutoForm id="formName" }}
- the
pageElementorevent- indicate the page element or JS related eventadditionalText- additional text to distinguish this string from others (optional)
Template text (HTML/Blaze)
Text in HTML/Blaze templates can be internationalized by adding an i18n tag:
{{_ "templateName_pageElement_additionalText" }}A specific example, found on a page element heading:
<!-- note the element nesting, for readability -->
<h1 class="page-header">
  {{_ "pageTemplate_header_text" }}
</h1>
JavaScript text
When internationalization strings are used in JavaScript, use the following pattern:
- fetch the ii18n string and store it in a descriptive variable
- use the i18n variable in related code
For example, when showing an sAlert to the user:
// Get a translation string
const message = TAPi18n._("templateName_event_translationString");

// Use the translation string
sAlert.warning(message);
Automated testing
End to End
There are some end to end tests on the tests directory. They were built using chimp.js.
Test suite execution
In order to run the end to end tests, the application must be running on a separated process
And the tests can be run via yarn
A new google chrome window will open and the scripts will be run there.
Running only specific test
It is possible to run a specific test file by changing tests/chimp-config.js file, under mocha_config.grep setting.
Since the test cases begin with a number, just put a number to run the desired file.
Packages
The project is built using the Meteor.js framework. The following Meteor packages provide important functionality.
Forms
AutoForm is used to provide easy input forms, based on schema definitions (see below).
Routing
- Iron Router is used for project routing.
- Simple JSON Routes is used where only JSON data is needed from a route.
Schema
Simple Schema is used to create schemas for our database collections.
Templating
Blaze is the templating language used in our project packages.
CSS
Bootstrap is the primary CSS framework for the templates.