🎄Viper
Viper 是一个基于Anno微服务引擎开发的Dashboard项目、示例项目。Anno 底层通讯可选用grpc、thrift。自带服务发现、调用链追踪、Cron 调度、限流、事件总线等等
🎩Java 实现 : https://github.com/duyanming/anno.thrift-parent
🔥在线演示地址 :http://anno.liqingxi.cn
🎃Anno 分布式开发框架
Anno 是一个分布式开发框架,支持 .net core3.1 、.net frameworker4.5 、 java
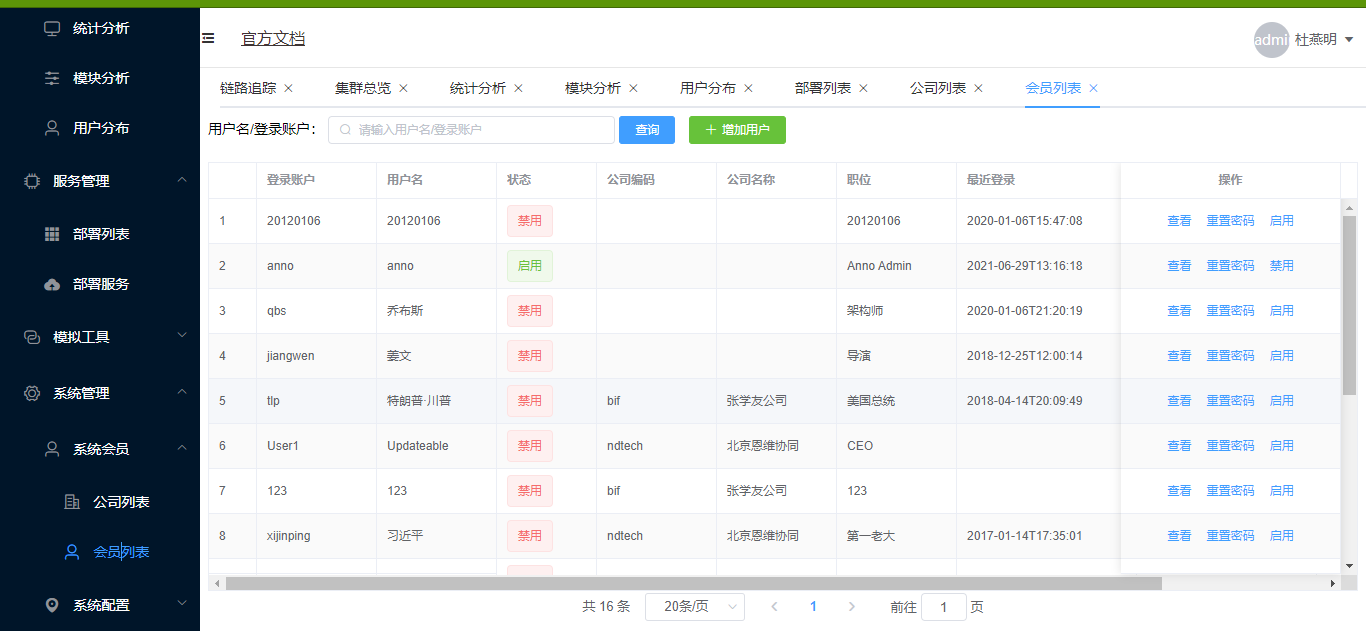
🎯1、运行Viper
🔫MySQL 数据库
运行数据库脚本创建数据库

	1、Viper\database\viper20210617_01.sql

	2、修改viperService 数据库连接字符串
		Viper\ViperService\bin\Debug\net6.0\Anno.config
<appSettings>
    <!-- 数据库连接字符串 Mysql-->
    <add key="ConnStr" value="server=127.0.0.1;database=viper;uid=bif;pwd=123456;SslMode=None;"/>
</appSettings>
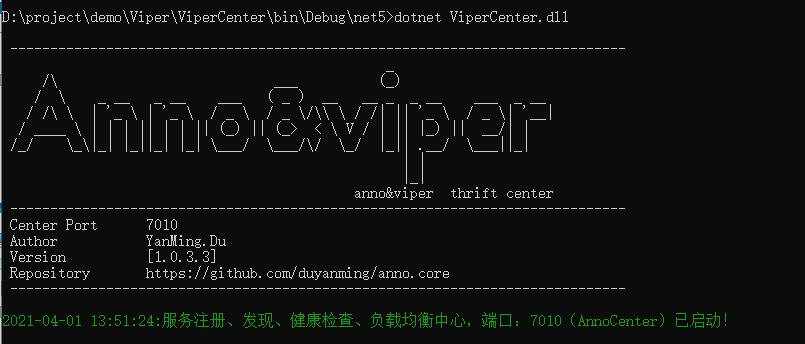
第一步:启动注册中心
	Viper\ViperCenter\bin\Debug\net6.0\Anno.config
<?xml version="1.0" encoding="utf-8"?>
<configuration>
  <!--ViperCenter 端口-->
  <Port>7010</Port>
    <!--ViperCenter 超时时间-->
  <TimeOut>120000</TimeOut>
  <Servers>
       <!--dc 注册到注册中心的 服务节点 (下面的内容是ViperService 启动后自动写入的内容)-->
    <dc name="Anno.Plugs.LogicService,Anno.Plugs.TraceService,Anno.Plugs.ViperService" nickname="ViperService-01" ip="100.100.100.9" port="7011" timeout="20000" weight="1" />
  </Servers>
</configuration>
进入项目文件夹
Viper\ViperCenter\bin\Debug\net6.0
运行命令 dotnet ViperCenter.dll
看到下图 说明运行成功
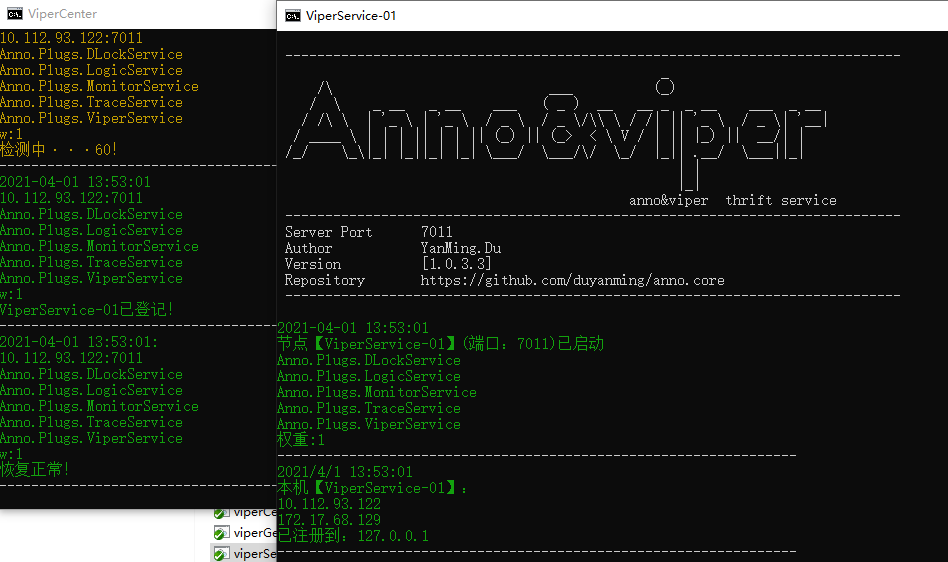
第二步:启动 ViperService
	Viper\ViperService\bin\Debug\net6.0\Anno.config
<?xml version="1.0" encoding="utf-8" ?>
<configuration>
  <!--0,0 第一位是 工作站,第二位数据中心
  (所有的 AnnoService 的 两位数不能重复例如不能存在【1,2】【1,2】)
  可以存在【1,2】【2,1】
  -->
  <IdWorker>0,0</IdWorker>
  <!--App名称-->
  <AppName>ViperService-01</AppName>
  <!--监听端口-->
  <Port>7011</Port>
  <!--权重-->
  <Weight>1</Weight>
  <!--功能 非Anno.Plugs  加入方式-->
  <FuncName></FuncName>
  <!--忽略的功能 Trace,Logic-->
  <IgnoreFuncName></IgnoreFuncName>
  <!--超时时间毫秒-->
  <TimeOut>20000</TimeOut>
  <!--注册到的目标-->
  <Ts Ip="127.0.0.1" Port="7010"/>
  <IocDll>
    <!-- IOC 仓储--><!--
    <Assembly>Anno.Repository</Assembly>
    --><!-- 领域--><!--
    <Assembly>Anno.Domain</Assembly>
    --><!-- 查询服务--><!--
    <Assembly>Anno.QueryServices</Assembly>
    --><!--事件Handler--><!--
    <Assembly>Anno.Command.Handler</Assembly>-->
  </IocDll>
  <appSettings>
    <!-- 数据库连接字符串 Mysql-->
    <add key="ConnStr" value="server=127.0.0.1;database=viper;uid=bif;pwd=123456;SslMode=None;"/>
    <!--
    redisConn Redis 连接字符串 127.0.0.1:6379,abortConnect=false,allowAdmin =true,keepAlive=180
    redisPrefix Key 前缀 Anno:
    redisExpiryDate Key 有效期  单位(分钟) 20
    redisSwitch 是否开启数据库 false 不开启 false
    <add key="redisConn" value=""/>
    <add key="redisPrefix" value="SW:"/>
    <add key="redisExpiryDate" value="20"/>
    <add key="redisSwitch" value="false"/>
    -->
  </appSettings>
</configuration>
一般情况下只用修改
 <!--注册到的目标-->
  <Ts Ip="127.0.0.1" Port="7010"/>

 <!-- 数据库连接字符串 Mysql-->
    <add key="ConnStr" value="server=127.0.0.1;database=viper;uid=bif;pwd=123456;SslMode=None;"/>
ViperService 可以和 ViperCenter 不在同一台电脑,也可以运行多个server 也可以负载均衡,高级用法随后介绍
进入项目文件夹 Viper\ViperService\bin\Debug\net6.0
运行命令 dotnet ViperService.dll
看到下图 说明 ViperService 成功运行 并且已经注册到 注册中心(ViperCenter)运行成功
启动 Viper.GetWay
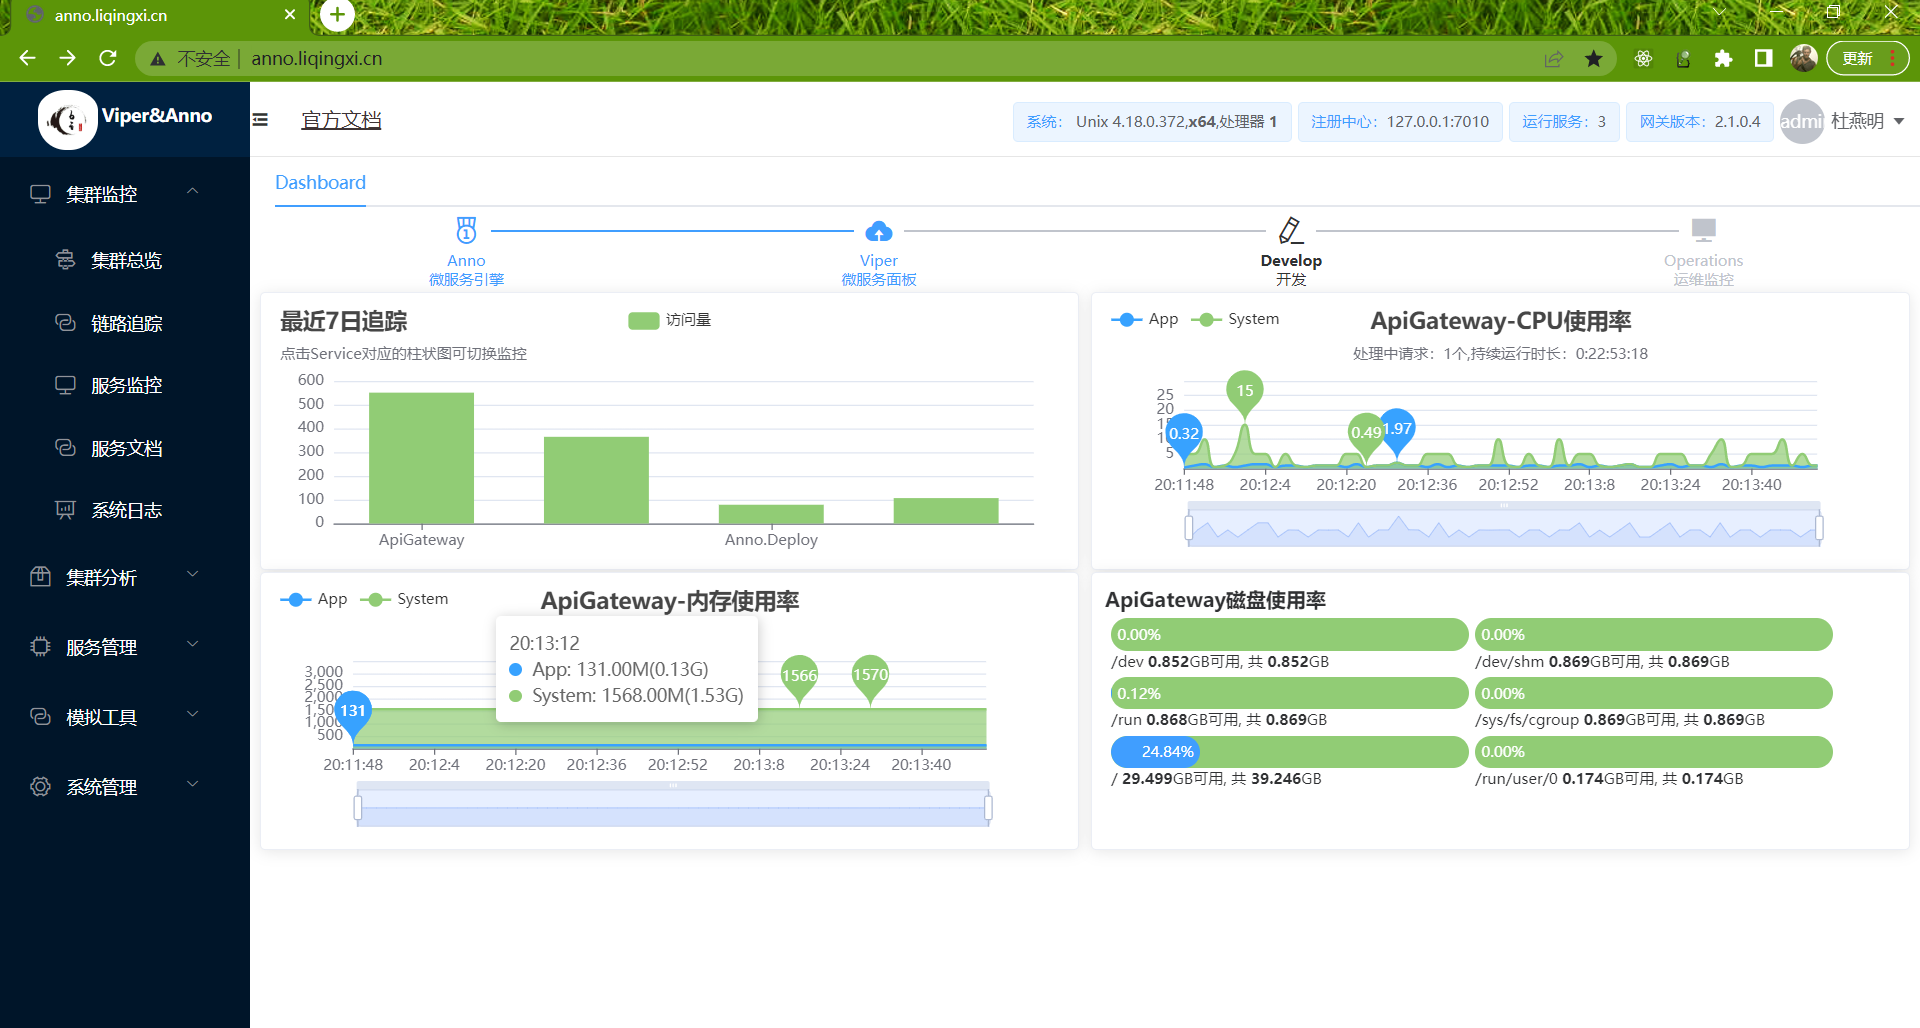
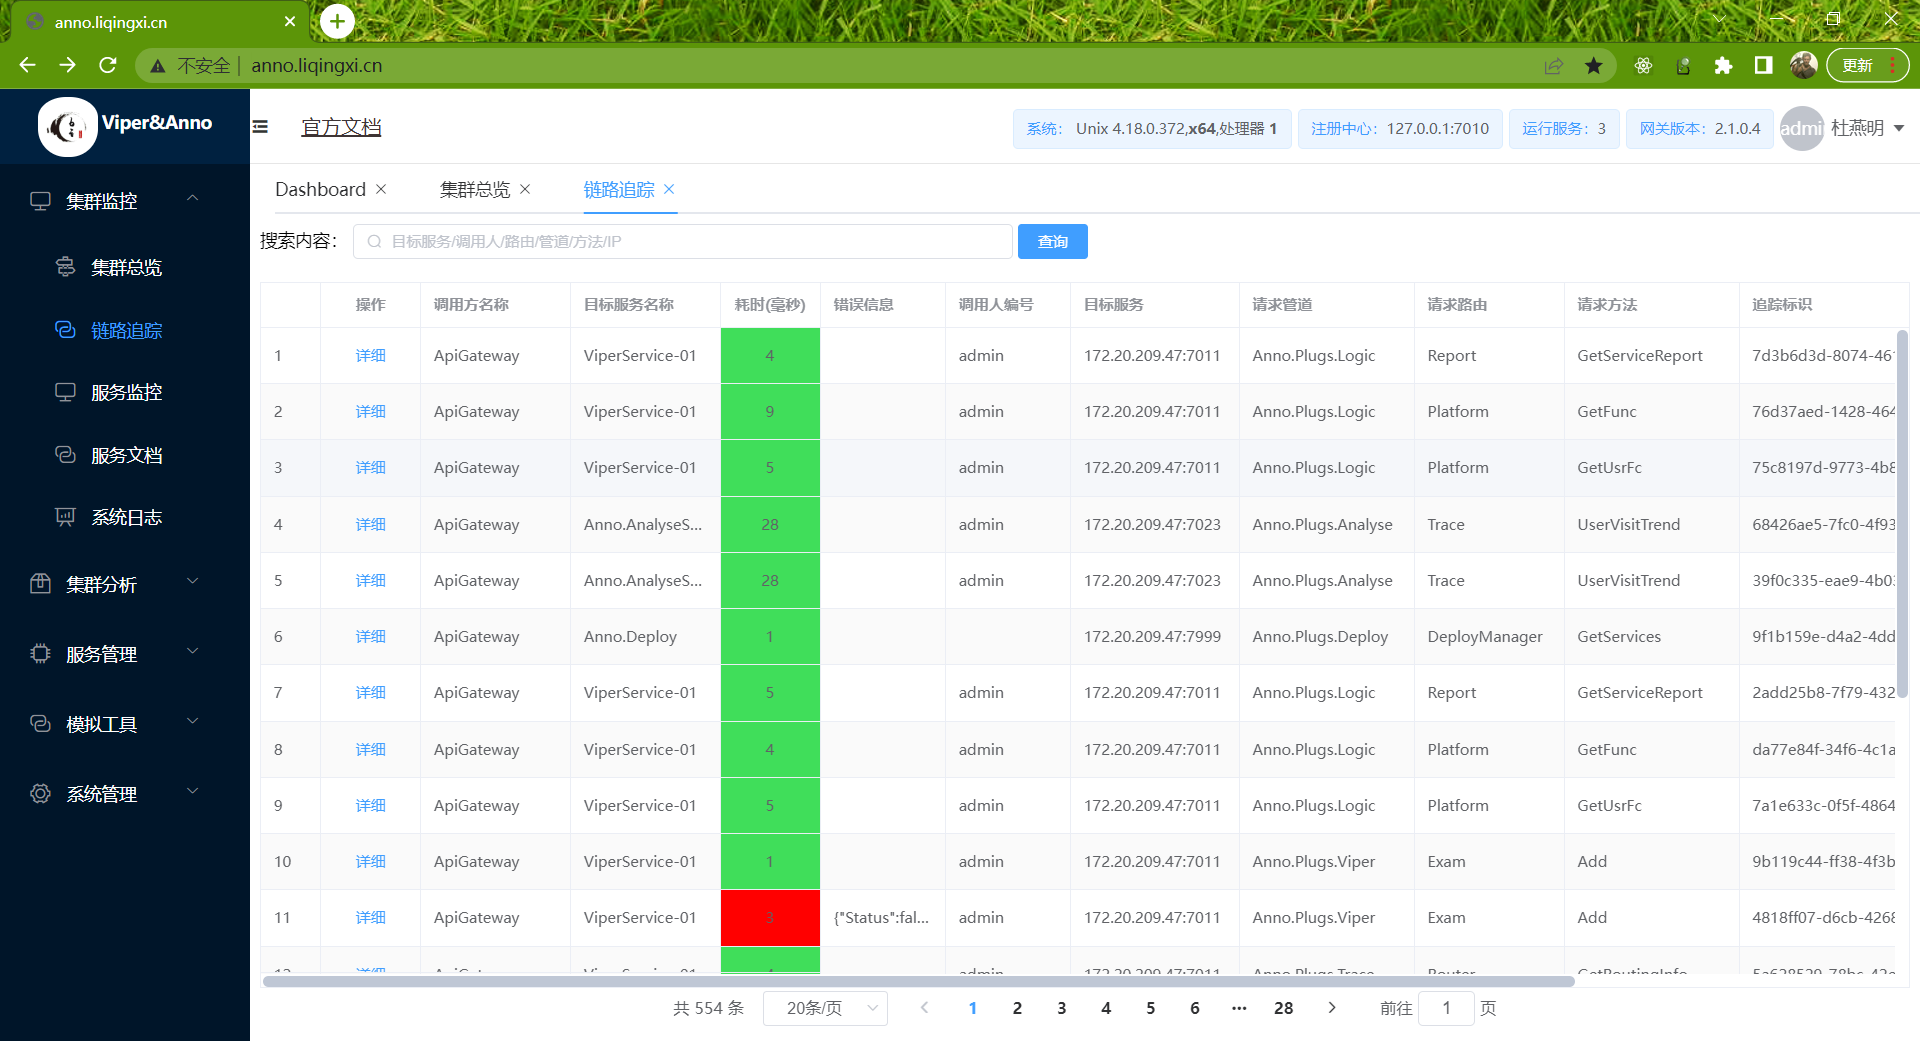
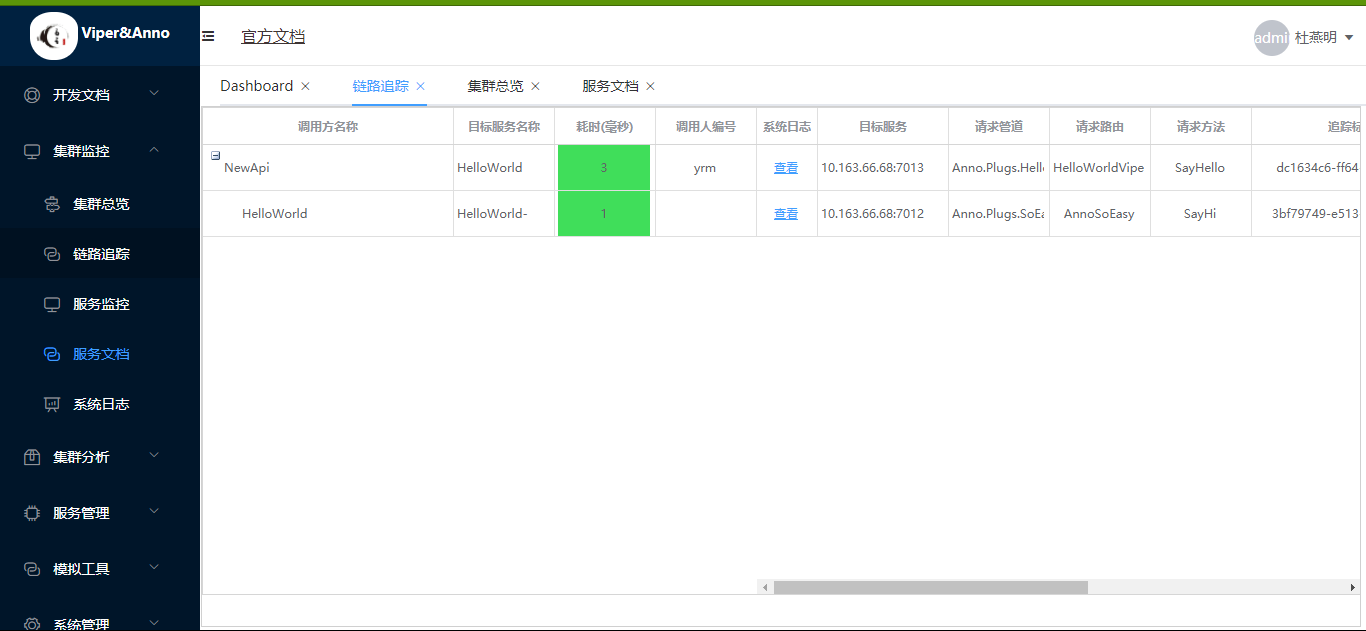
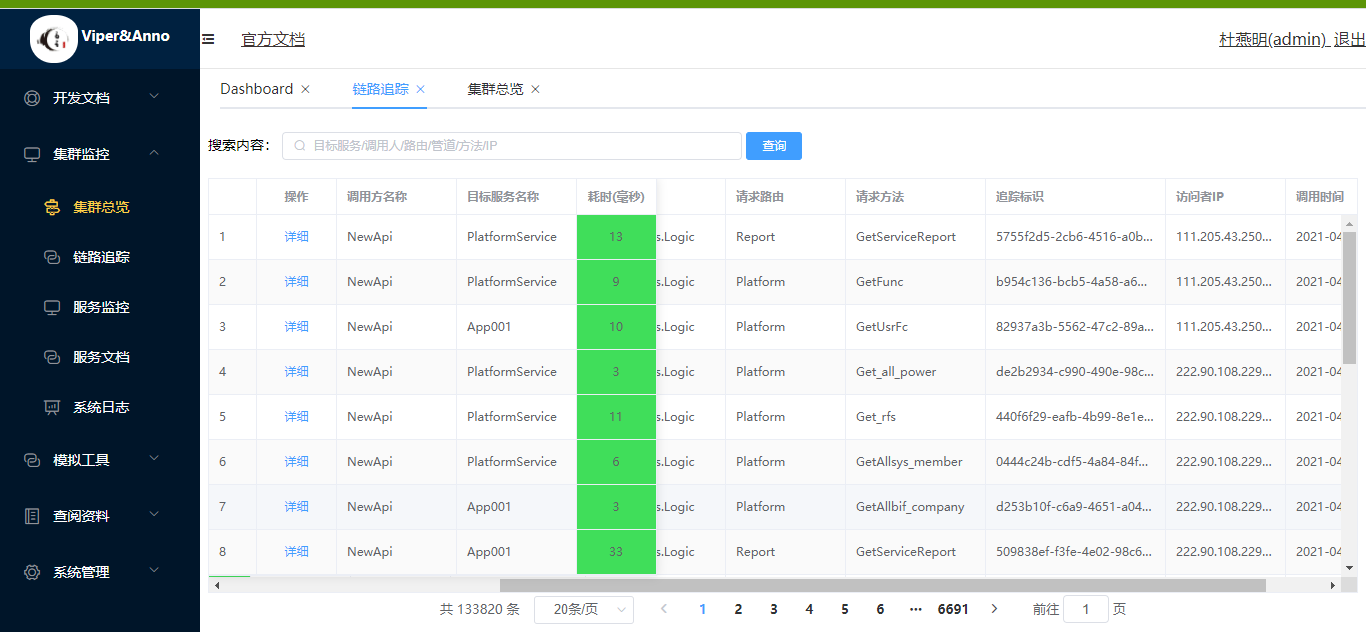
第三步:调用链追踪
	Viper\Viper\appsettings.json
{
  "Target": {
    "AppName": "ApiGateway",
    "IpAddress": "127.0.0.1",
    "Port": 7010,
    "TraceOnOff": true
  },
  "Limit": {
    "Enable": true,
    "TagLimits": [
      {
        "channel": "*",
        "router": "*",
        "timeSpan": "1",
        "rps": 100,
        "limitSize": 100
      }
    ],
    "DefaultIpLimit": {
      "timeSpan": 1,
      "rps": 200,
      "limitSize": 200
    },
    "IpLimits": [
      {
        "ipMatch": "0.0.0.1",
        "timeSpan": 1,
        "rps": 100,
        "limitSize": 100
      },
      {
        "ipMatch": "192.168.0.10 - 192.168.10.20",
        "timeSpan": 1,
        "rps": 100,
        "limitSize": 100
      }
    ],
    "White": [
      "0.0.0.1",
      "192.168.1.2",
      "192.168.2.18"
    ],
    "Black": [
      "0.0.0.2",
      "192.168.3.18"
    ]
  }
}

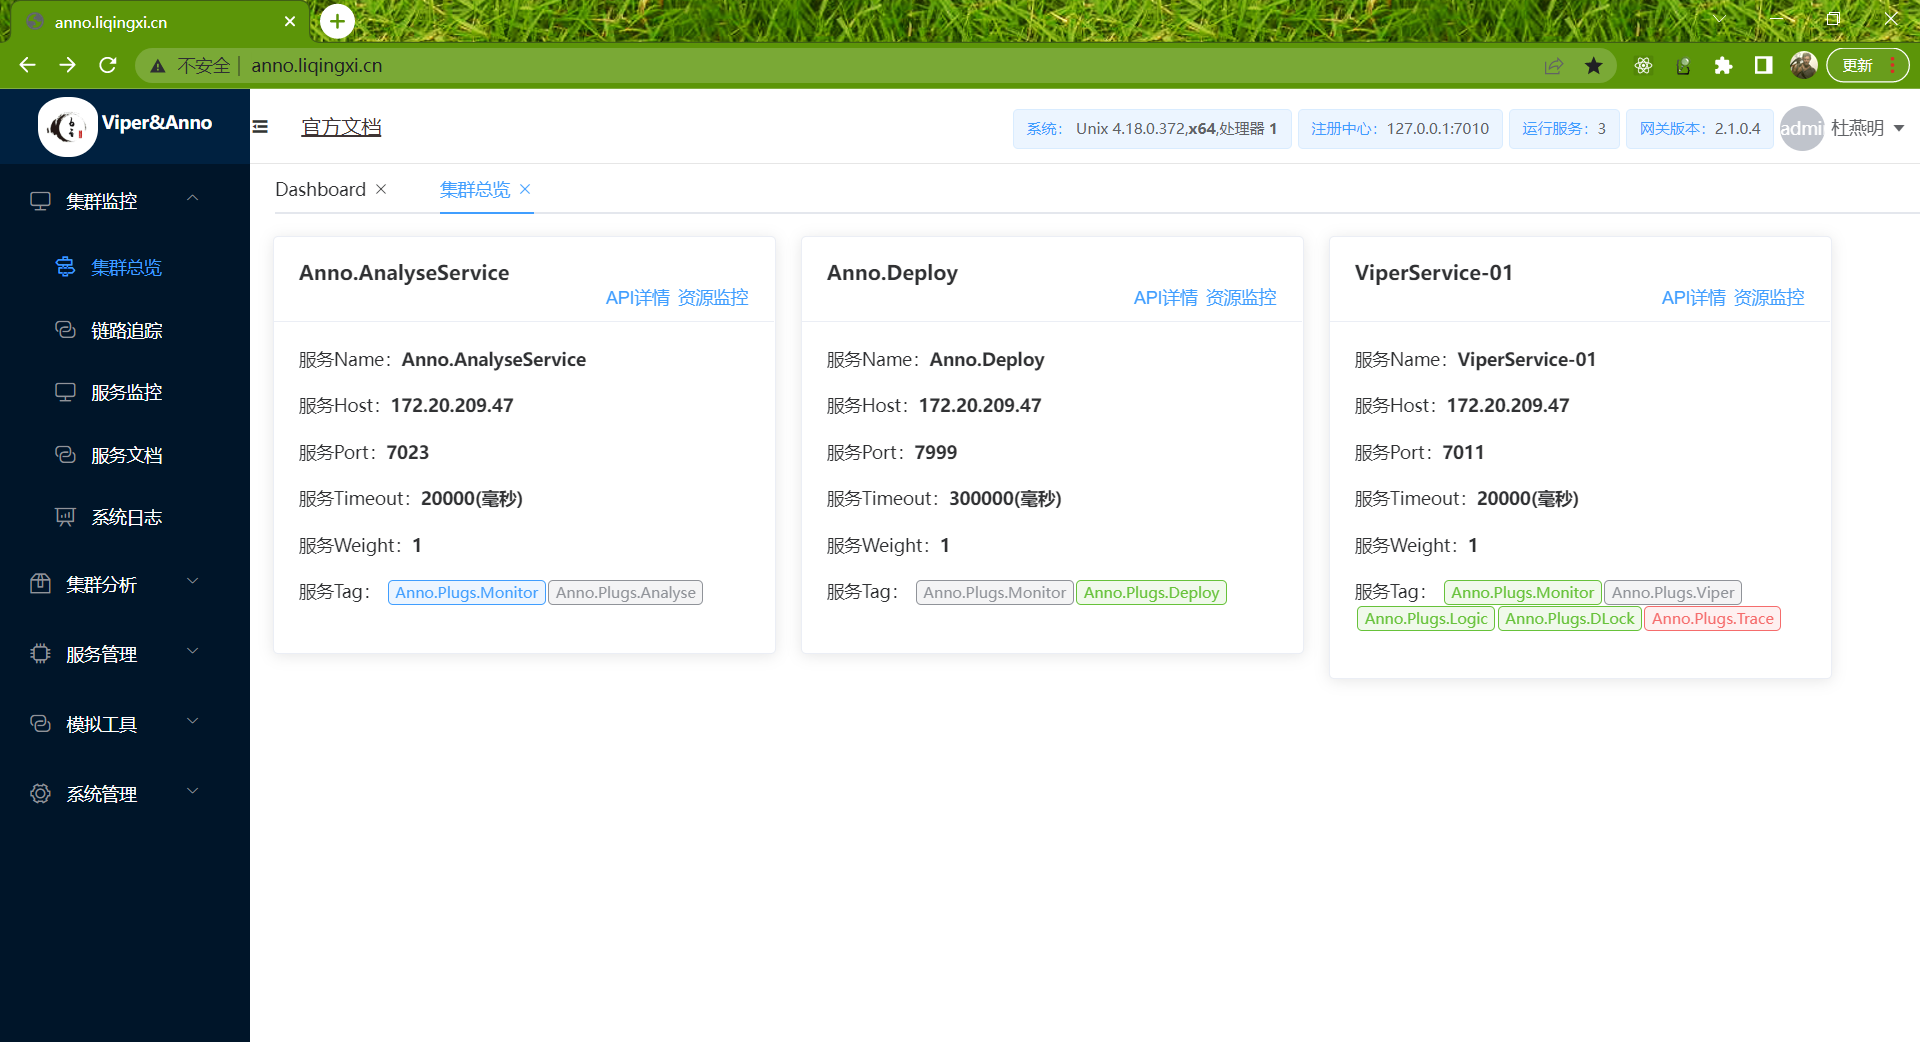
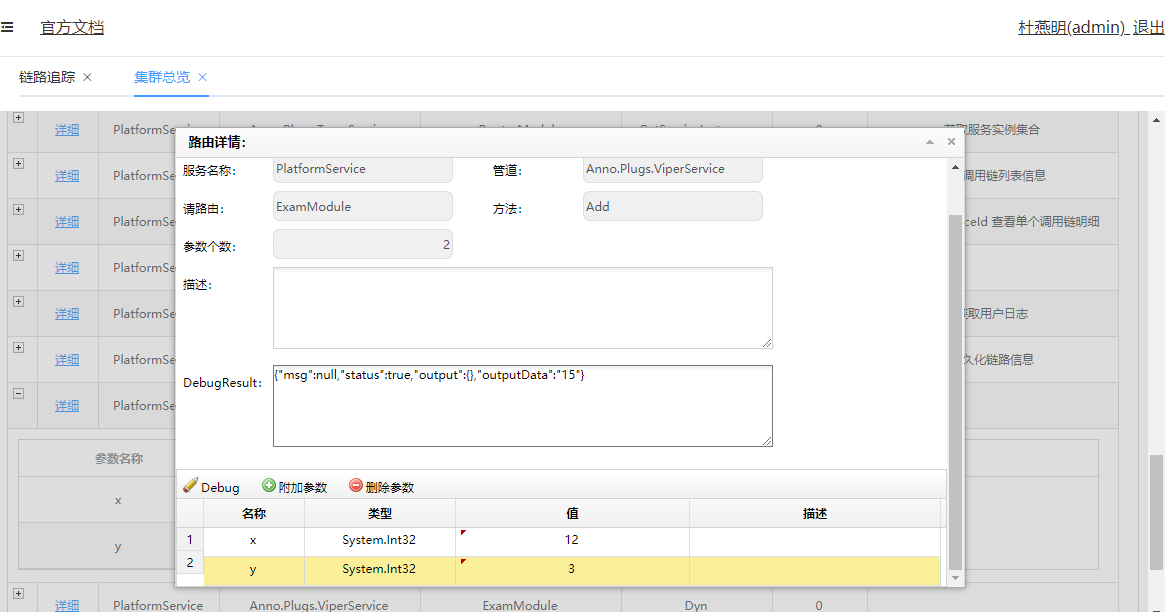
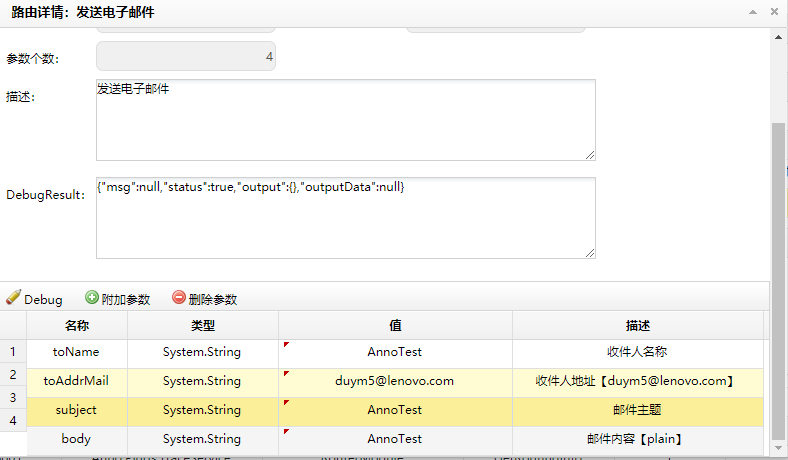
第四步:集群路由信息

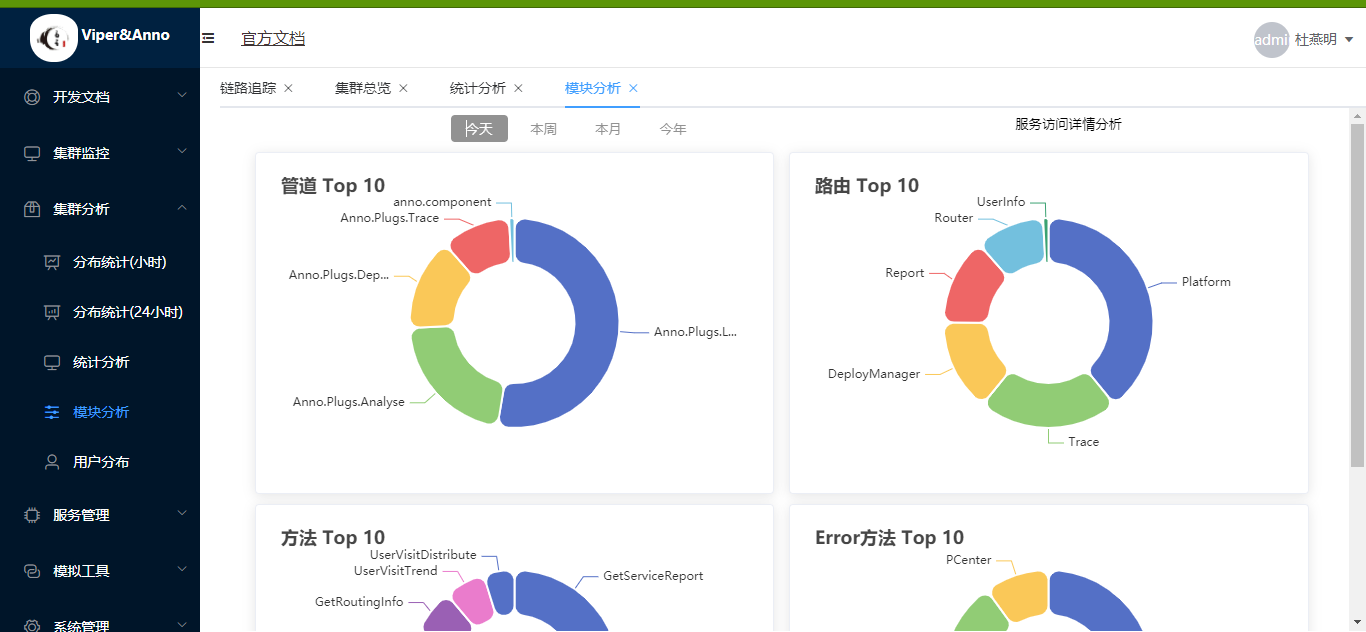
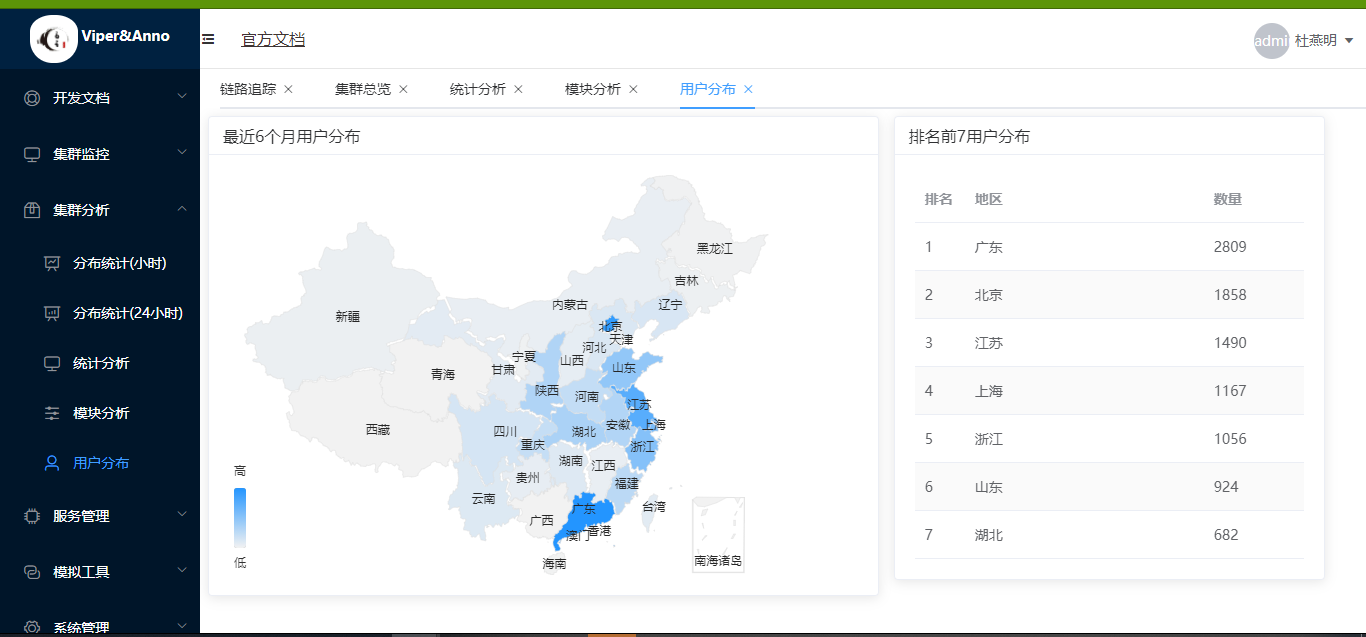
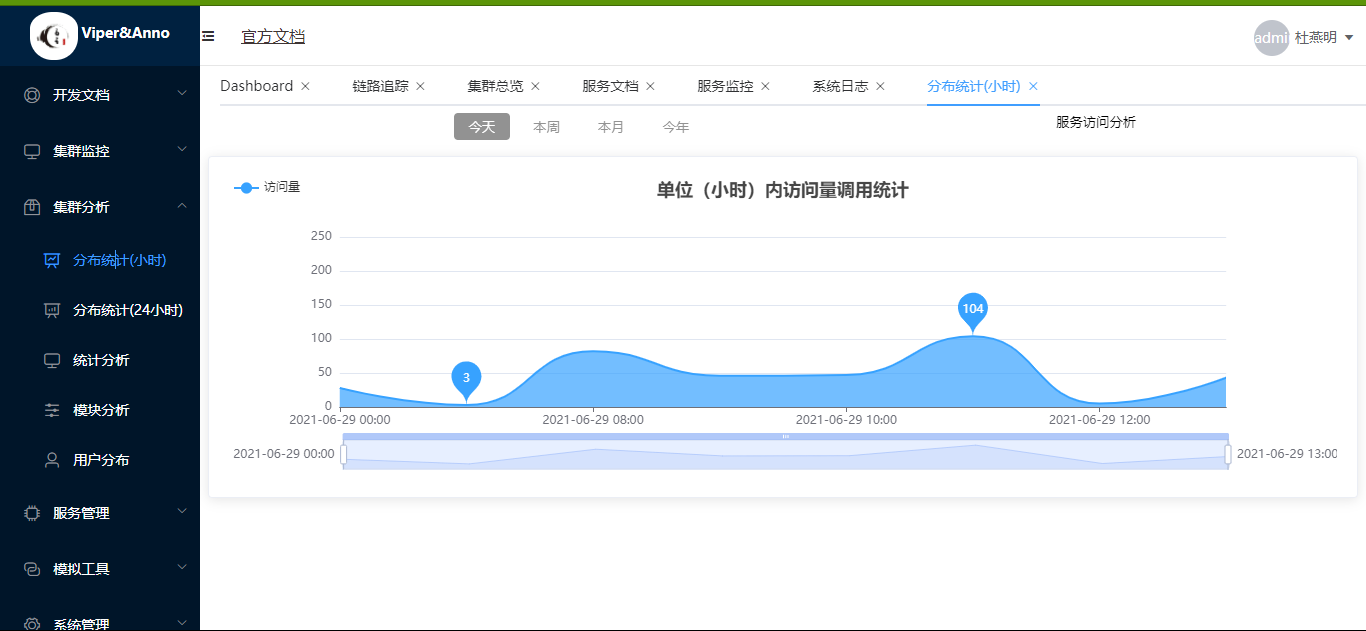
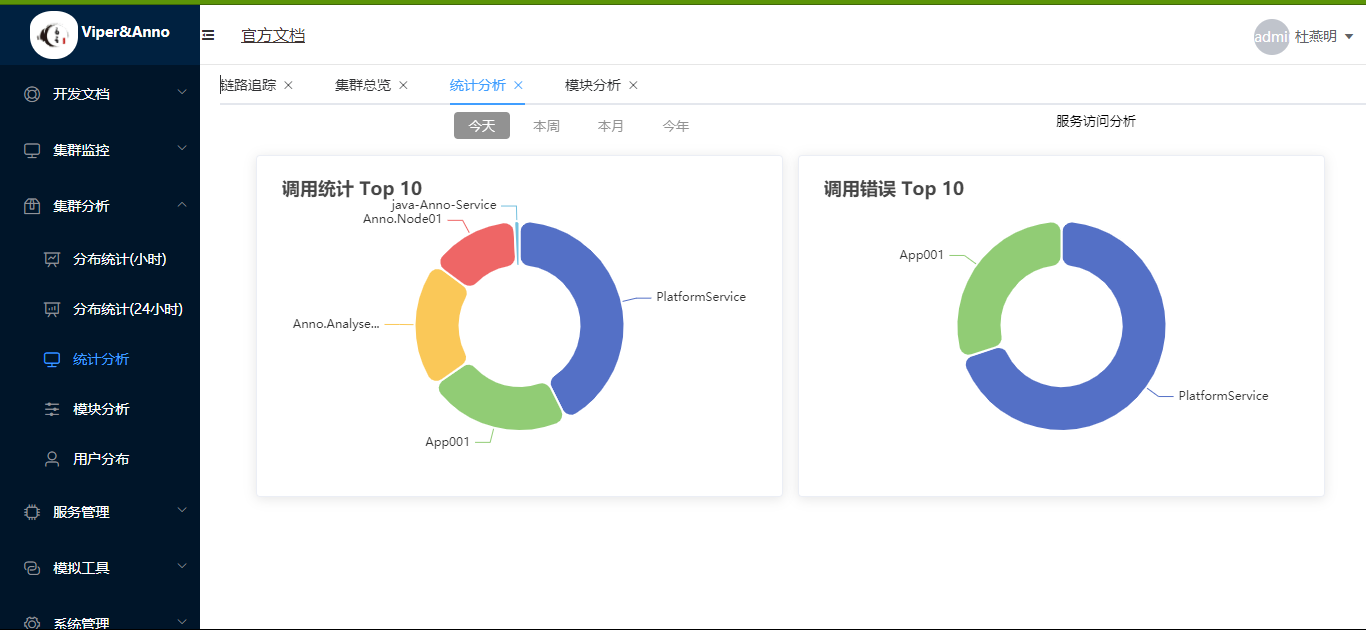
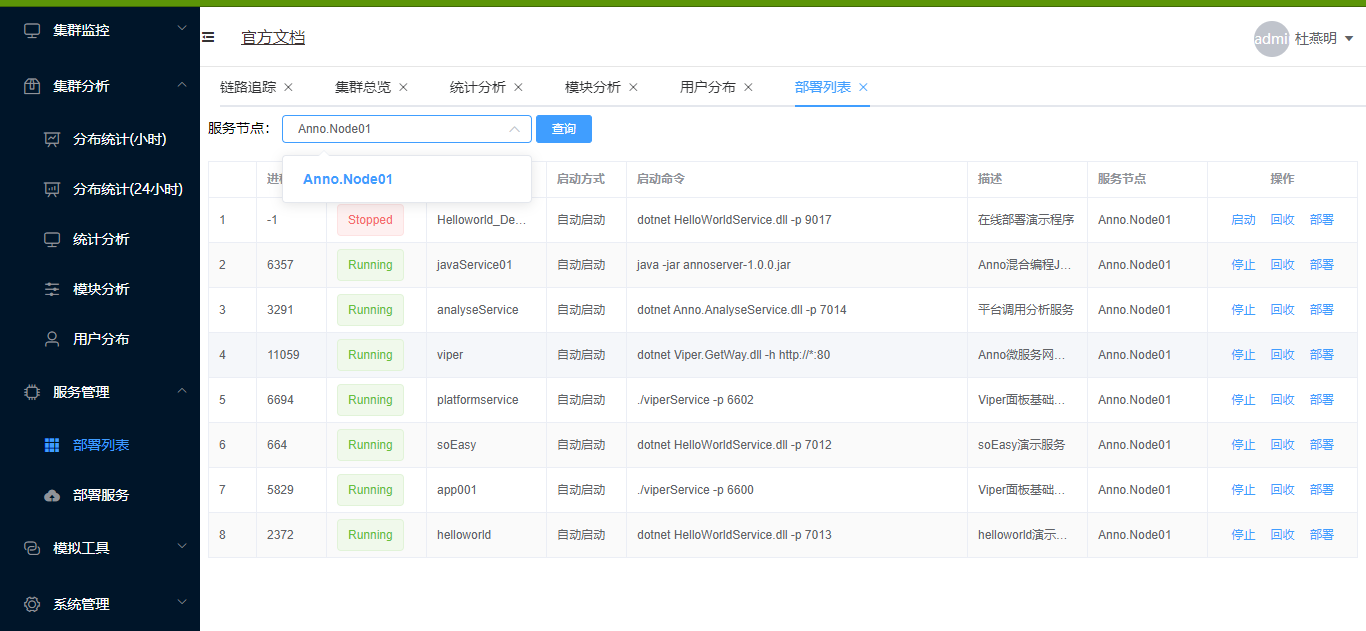
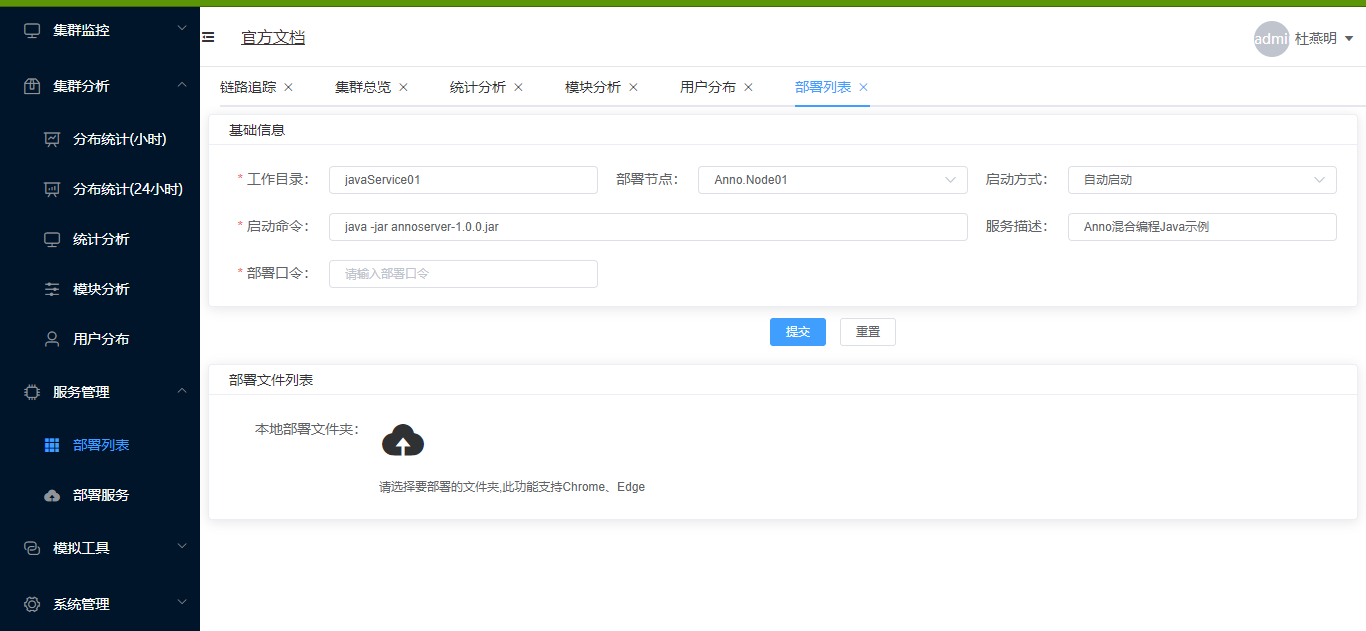
第五步:服务性能监控

👒Anno EventBus
Eventbus Support InMemory and Rabbitmq
⛳1、Server配置
	//指定EventHandler的 所在程序集
	var funcs = Anno.Const.Assemblys.Dic.Values.ToList();
                #region RabbitMQEventBus
                //消费失败通知
                EventBusSetting.Default.RabbitConfiguration = new RabbitConfiguration()
                {
                    HostName = "192.168.100.173",
                    VirtualHost = "dev",
                    UserName = "dev",
                    Password = "dev",
                    Port = 5672
                };
                RabbitMQEventBus.Instance.ErrorNotice += (string exchange, string routingKey, Exception exception, string body) =>
                        {
                            Log.Fatal(new { exchange, routingKey, exception, body }, typeof(RabbitMQEventBus));
                        };
                RabbitMQEventBus.Instance.SubscribeAll(funcs);

                #endregion
                #region InMemory EventBus
                EventBus.Instance.ErrorNotice += (string exchange, string routingKey, Exception exception, string body) =>
                {
                    Log.Fatal(new { exchange, routingKey, exception, body }, typeof(EventBus));
                };
                EventBus.Instance.SubscribeAll(funcs);
⚾2、EventData配置
	using Anno.EventBus;

	namespace Events
	{
	    public class FirstMessageEvent:EventData
	    {
	        public string Message { get; set; }
	    }
	}
🎳3、EventHandler配置
	namespace Anno.Plugs.SamsundotService.EventHandler
	{
	    using Anno.EventBus;
	    using Events;

	    class FirstMessageEventHandler : IEventHandler<FirstMessageEvent>
	    {
	        public void Handler(FirstMessageEvent entity)
	        {
	            Log.Log.Info(new { Plugs= "Samsundot",Entity=entity },typeof(FirstMessageEventHandler));
	        }
	    }
	}
   namespace Anno.Plugs.YYTestService.EventHandler
   {
       using Anno.EventBus;
       using Events;

       class FirstMessageEventHandler : IEventHandler<FirstMessageEvent>
       {
           public void Handler(FirstMessageEvent entity)
           {
               Log.Log.Info(new { Plugs = "YYTest", Entity = entity },               typeof(FirstMessageEventHandler));
           }
       }
       /// <summary>
       /// 异常消费演示,测试 消费失败通知
       /// </summary>
       class FirstMessageExceptionEventHandler : IEventHandler<FirstMessageEvent>
       {
           public void Handler(FirstMessageEvent entity)
           {
               Log.Log.Info(new { Plugs = "YYTest",Handle= "FirstMessageExceptionEventHandler", Entity = entity }, typeof(FirstMessageEventHandler));
               throw new Exception("异常消费演示,测试 消费失败通知 From FirstMessageExceptionEventHandler!");
           }
       }
   }
🐎4、中间件
💥4.1 缓存中间件
💪Install-Package Anno.EngineData.Cache
Install-Package Anno.EngineData.Cache
using System;
using System.Collections.Generic;
using System.Text;
using Anno.EngineData;
using Anno.EngineData.Cache;


namespace Anno.Plugs.CacheRateLimitService
{
   public class CacheModule : BaseModule
   {
       /*
       参数1:缓存长度
       参数2:缓存存活时间
       参数3:缓存存活时间是否滑动
       */
       [CacheLRU(5,6,true)]
       public ActionResult Cache(string msg)
       {
           Console.WriteLine(msg);
           return new ActionResult(true, null,null,msg);
       }
   }
}
🔰4.2 限流中间件
💄Install-Package Anno.EngineData.RateLimit
Install-Package Anno.EngineData.RateLimit
using System;
using System.Collections.Generic;
using System.Text;
using Anno.EngineData;
using Anno.RateLimit;

namespace Anno.Plugs.CacheRateLimitService
{
   public class LimitModule : BaseModule
   {
       /*
       参数1:限流算法是令牌桶还是漏桶
       参数2:限流时间片段单位秒
       参数3:单位时间可以通过的请求个数
       参数4:桶容量
       */
       [EngineData.Limit.RateLimit(LimitingType.TokenBucket,1,5,5)]
       public ActionResult Limit(string msg)
       {
           Console.WriteLine(msg);
           return new ActionResult(true, null, null, msg);
       }
   }
}
#dotnet dotnet publish "E:\gitProject\Anno\DCS\AppCenter\AppCenter.csproj" -c Release -r linux-x64 -o "E:\gitProject\Anno\DCS\AppCenter\bin"
#配置文件说明
{
  "Target": {
    "AppName": "traceWeb",--服务名称
    "IpAddress": "127.0.0.1",--注册中心地址
    "Port": 6660,--注册中心端口
    "TraceOnOff": true--启用调用链追踪
  },
  "Limit": {--限流
    "Enable": true,--是否启用限流
    "TagLimits": [--标签限流
      {
        "channel": "*",--管道
        "router": "*",--路由
        "timeSpan": "10",--时间片单位秒
        "rps": 1,--时间片内的 有效请求个数
        "limitSize": 2--漏桶容量大小 做缓冲用
      }
    ],
    "DefaultIpLimit": {--默认IP限流策略
      "timeSpan": 1,
      "rps": 20,
      "limitSize": 200
    },
	"IpLimits": [--IP限流策略(ipMatch参考IPAddressRange)
      {
        "ipMatch": "0.0.0.1",
        "timeSpan": 1,
        "rps": 100,
        "limitSize": 100
      },
      {
        "ipMatch": "192.168.0.10 - 192.168.10.20",
        "timeSpan": 1,
        "rps": 100,
        "limitSize": 100
      }
    ],
    "White": [--白名单
      "0.0.0.1",
      "192.168.1.2",
      "192.168.2.18"
    ],
    "Black": [--黑名单
      "0.0.0.2",
      "192.168.3.18"
    ]
  }
}