


<< 📝 Description | 📌 Key Features | 🎮 Demo | ⚙ Installation | 🚀 Usage | 🛠 Development Note | 🤝 Contributing >>
📝 Description

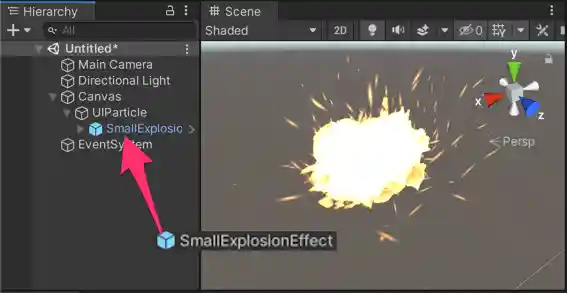
This package uses the new APIs MeshBake/MeshTrailBake (introduced in Unity 2018.2) to render particles through CanvasRenderer.
You can render, mask, and sort your ParticleSystems for UI without the need for an additional Camera, RenderTexture, or Canvas.
- 📌 Key Features
- 🎮 Demo
- ⚙ Installation
- 🚀 Usage
- 🛠 Development Note
- 🤝 Contributing
- License
- Author
- See Also
📌 Key Features
🎮 Demo

- WebGL Demo (Cartoon FX & War FX)
- Cartoon FX Free & War FX (by Jean Moreno (JMO)) with UIParticle

⚙ Installation
This package requires Unity 2018.3 or later.
Install via OpenUPM
- This package is available on OpenUPM package registry.
- This is the preferred method of installation, as you can easily receive updates as they're released.
- If you have openupm-cli installed, then run the following command in your project's directory:
openupm add com.coffee.ui-particle - To update the package, use Package Manager UI (
Window > Package Manager) or run the following command with@{version}:openupm add com.coffee.ui-particle@4.9.0
Install via UPM (with Package Manager UI)
- Click
Window > Package Managerto open Package Manager UI. - Click
+ > Add package from git URL...and input the repository URL:https://github.com/mob-sakai/ParticleEffectForUGUI.git

- To update the package, change suffix
#{version}to the target version.- e.g.
https://github.com/mob-sakai/ParticleEffectForUGUI.git#4.9.0
- e.g.

Install via UPM (Manually)
-
Open the
Packages/manifest.jsonfile in your project. Then add this package somewhere in thedependenciesblock:{ "dependencies": { "com.coffee.ui-particle": "https://github.com/mob-sakai/ParticleEffectForUGUI.git", ... } } -
To update the package, change suffix
#{version}to the target version.- e.g.
"com.coffee.ui-particle": "https://github.com/mob-sakai/ParticleEffectForUGUI.git#4.9.0",
- e.g.
Install as Embedded Package
- Download a source code zip file from Releases and extract it.
- Place it in your project's
Packagesdirectory.


- If you want to fix bugs or add features, install it as an embedded package.
- To update the package, you need to re-download it and replace the contents.
🚀 Usage
Component: UIParticle
UIParticle controls the ParticleSystems that are attached to its own game objects and child game objects.

- Maskable: Does this graphic allow maskable.
- Scale: Scale the rendering particles. When the
3Dtoggle is enabled, 3D scale (x, y, z) is supported. - Animatable Properties: If you want to update material properties (e.g.,
_MainTex_ST,_Color) in AnimationClip, use this to mark as animatable. - Mesh Sharing: Particle simulation results are shared within the same group. A large number of the same effects can
be displayed with a small load. When the
Randomtoggle is enabled, it will be grouped randomly.- None: Disable mesh sharing.
- Auto: Automatically select Primary/Replica.
- Primary: Provides particle simulation results to the same group.
- Primary Simulator: Primary, but do not render the particle (simulation only).
- Replica: Render simulation results provided by the primary.
- Position Mode: Emission position mode.
- Absolute: The particles will be emitted from the world position.
- Relative: The particles will be emitted from the scaled position.
- Auto Scaling Mode: How to automatically adjust when the Canvas scale is changed by the screen size or reference resolution.
- None: Do nothing.
- Transform: Transform.lossyScale (=world scale) will be set to (1, 1, 1).
- UIParticle: UIParticle.scale will be adjusted.
- Use Custom View: Use this if the particles are not displayed correctly due to min/max particle size.
- Custom view size: Change the bake view size.
- Rendering Order: The ParticleSystem list to be rendered. You can change the order and the materials.
NOTE: Press the Refresh button to reconstruct the rendering order based on children ParticleSystem's sorting order
and z-position.
Basic Usage
- Select
GameObject/UI/ParticleSystemto create UIParticle with a ParticleSystem.
- Adjust the ParticleSystem as you like.


Usage with Your Existing ParticleSystem Prefab
- Select
GameObject/UI/ParticleSystem (Empty)to create UIParticle.
- Drag and drop your ParticleSystem prefab onto UIParticle.


Usage with Mask or RectMask2D Component
If you want to mask particles, set a stencil-supported shader (such as UI/UIAdditive) to the material for
ParticleSystem.
If you use some custom shaders, see
the How to Make a Custom Shader to Support Mask/RectMask2D Component
section.

Usage with Script
// Instantiate ParticleSystem prefab with UIParticle on runtime.
var go = GameObject.Instantiate(prefab);
var uiParticle = go.AddComponent<UIParticle>();
uiParticle.scale = 100;

// Control by ParticleSystem.
particleSystem.Play();
particleSystem.Emit(10);

// Control by UIParticle.
uiParticle.Play();
uiParticle.Stop();
Component: UIParticleAttractor
UIParticleAttractor attracts particles generated by the specified ParticleSystem.


- Particle Systems: Attracts particles generated by the specified ParticleSystems.
- Destination Radius: Once the particle is within the radius, the particle lifetime will become 0, and
OnAttractedwill be called. - Delay Rate: Delay to start attracting. It is a percentage of the particle's start lifetime.
- Max Speed: Maximum speed of attracting. If this value is too small, attracting may not be completed by the end of
the lifetime, and
OnAttractedmay not be called. - Movement: Attracting movement type. (
Linear,Smooth,Sphere) - Update Mode: Update mode.
- Normal: Update with scaled delta time.
- Unscaled Time: Update with unscaled delta time.
- OnAttracted: An event called when attracting is complete (per particle).
Project Settings

- Click
Edit > Project Settingsto open the Project Settings window and then selectUI > UI Particlecategory.
🛠 Development Note
Compares the Baking mesh approach with the conventional approach
-
Baking mesh approach (=UIParticle)

- ✅ Rendered as is.
- ✅ Maskable.
- ✅ Sortable.
- ✅ Less objects.
-
Do nothing (=Plain ParticleSystem)

- ✅ Rendered as is.
- ❌ Looks like a glitch.
- ❌ Not maskable.
- ❌ Not sortable.
-
Convert particle to UIVertex (=UIParticleSystem)

- ✅ Maskable.
- ✅ Sortable.
- ❌ Adjustment is difficult.
- ❌ Requires UI shaders.
- ❌ Difficult to adjust scale.
- ❌ Force hierarchy scalling.
- ❌ Simulation results are incorrect.
- ❌ Trail, rotation of transform, time scaling are not supported.
- ❌ Generate heavy GC every frame.
-
Use Canvas to sort (Sorting By Canvas )

- ✅ Rendered as is.
- ✅ Sortable.
- ❌ You must to manage sorting orders.
- ❌ Not maskable.
- ❌ More batches.
- ❌ Requires Canvas.
-
Use RenderTexture
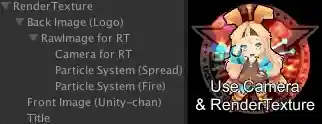
- ✅ Maskable.
- ✅ Sortable.
- ❌ Requires Camera and RenderTexture.
- ❌ Difficult to adjust position and size.
- ❌ Quality depends on the RenderTexture's setting.


Performance test results
| Approach | FPS on Editor | FPS on iPhone6 | FPS on Xperia XZ |
|---|---|---|---|
| Particle System | 43 | 57 | 22 |
| UIParticleSystem | 4 | 3 | 0 (unmeasurable) |
| Sorting By Canvas | 43 | 44 | 18 |
| UIParticle | 17 | 12 | 4 |
| UIParticle with MeshSharing | 44 | 45 | 30 |
🔍 FAQ: Why Are My UIParticles Not Displayed Correctly?
If ParticleSystem alone displays particles correctly but UIParticle does not, please check the following points:
- Shader Limitation
UIParticledoes not support all built-in shaders except forUI/Default.- Most cases can be solved by using
UI/AdditiveorUI/Default.
- Particles are not masked
UIParticleis maskable.- Set
MaskorRectMask2Dcomponent properly. - Use maskable/clipable shader (such
as
UI/AdditiveorUI/Default)
- Particles are too small
- If particles are small enough, they will not appear on the screen.
- Increase the
Scalevalue. - If you don't want to change the apparent size depending on the resolution, try the
Auto Scalingoption.
- Particles are too many
- No more than 65535 vertices can be displayed (for mesh combination limitations).
- Please set
Emissionmodule andMax Particlesof ParticleSystem properly.
- Particles are emitted off-screen.
- When
Position Mode = Relative, particles are emitted from the scaled position of the ParticleSystem, not from the screen point of the ParticleSystem. - Place the ParticleSystem in the proper position or try
Position Mode = Absolute.
- When
- Attaching
UIParticleto the same object asParticleSystemTransform.localScalewill be overridden by theAuto Scalingoption.- It is recommended to place
ParticleSystemunderUIParticle.
- If
Transform.localScalecontains 0, rendering will be skipped. - Displayed particles are in the correct position but too large/too small
- Adjust
ParticleSystem.renderer.Min/MaxParticleSize.
- Adjust
Shader Limitation
The use of UI shaders is recommended.
- If you need a simple Additive shader, use the
UI/Additiveshader instead. - If you need a simple alpha-blend shader, use the
UI/Defaultshader instead. - If your custom shader does not work properly with UIParticle, consider creating a custom UI shader.
Built-in shaders are not supported
UIParticle does not support all built-in shaders except for UI/Default.
If their use is detected, an error is displayed in the inspector.
Use UI shaders instead.
(Unity 2018 or 2019) UV.zw components will be discarded
UIParticleRenderer renders the particles based on UIVertex.
Therefore, only the xy components are available for each UV in the shader. (zw components will be discarded).
So unfortunately, UIParticles will not work well with some shaders.
(Unity 2018 or 2019) Custom vertex streams
When using custom vertex streams, you can fill zw components with "unnecessary" data.
Refer to this issue for more information.
Overheads
UIParticle has some overheads, and the batching depends on uGUI.
When improving performance, keep the following in mind:
- If you are displaying a large number of the same effect, consider the
Mesh Sharingfeature in the UIParticle Component.- If you don't like the uniform output, consider the
Random Groupfeature.

- If you don't like the uniform output, consider the
- If you are using multiple materials, you will have more draw calls.
- Consider a single material, atlasing the sprites, and using
Spritemode in theTexture Sheet Animationmodule in the ParticleSystem.
- Consider a single material, atlasing the sprites, and using

How to Make a Custom Shader to Support Mask and RectMask2D Component
Shader tips
Shader "Your/Custom/Shader"
{
    Properties
    {
        // ...
        // #### required for Mask ####
        _StencilComp ("Stencil Comparison", Float) = 8
        _Stencil ("Stencil ID", Float) = 0
        _StencilOp ("Stencil Operation", Float) = 0
        _StencilWriteMask ("Stencil Write Mask", Float) = 255
        _StencilReadMask ("Stencil Read Mask", Float) = 255
        _ColorMask ("Color Mask", Float) = 15
        [Toggle(UNITY_UI_ALPHACLIP)] _UseUIAlphaClip ("Use Alpha Clip", Float) = 0
    }

    SubShader
    {
        Tags
        {
            // ...
        }

        // #### required for Mask ####
        Stencil
        {
            Ref [_Stencil]
            Comp [_StencilComp]
            Pass [_StencilOp]
            ReadMask [_StencilReadMask]
            WriteMask [_StencilWriteMask]
        }
        ColorMask [_ColorMask]
        // ...

        Pass
        {
            // ...
            // #### required for RectMask2D ####
            #include "UnityUI.cginc"
            #pragma multi_compile __ UNITY_UI_CLIP_RECT
            float4 _ClipRect;

            // #### required for Mask ####
            #pragma multi_compile __ UNITY_UI_ALPHACLIP

            struct appdata_t
            {
                // ...
            };

            struct v2f
            {
                // ...
                // #### required for RectMask2D ####
                float4 worldPosition    : TEXCOORD1;
            };

            v2f vert(appdata_t v)
            {
                v2f OUT;
                // ...
                // #### required for RectMask2D ####
                OUT.worldPosition = v.vertex;
                return OUT;
            }

            fixed4 frag(v2f IN) : SV_Target
            {
                // ...
                // #### required for RectMask2D ####
                #ifdef UNITY_UI_CLIP_RECT
                    color.a *= UnityGet2DClipping(IN.worldPosition.xy, _ClipRect);
                #endif

                // #### required for Mask ####
                #ifdef UNITY_UI_ALPHACLIP
                    clip (color.a - 0.001);
                #endif

                return color;
            }
            ENDCG
        }
    }
}
🤝 Contributing
Issues
Issues are incredibly valuable to this project:
- Ideas provide a valuable source of contributions that others can make.
- Problems help identify areas where this project needs improvement.
- Questions indicate where contributors can enhance the user experience.
Pull Requests
Pull requests offer a fantastic way to contribute your ideas to this repository.
Please refer to CONTRIBUTING.md
and develop branch for guidelines.
Support
This is an open-source project developed during my spare time.
If you appreciate it, consider supporting me.
Your support allows me to dedicate more time to development. 😊


License
- MIT