Interactive Java Notebooks
Using Interactive Java Notebooks
What is an Interactive Java Notebook?
Interactive Java Notebooks (IJNB) bring code and narrative together in a single, living document. Rather than switching between a code editor, a terminal, and separate documentation, you can write Java code, execute it, and capture the results right alongside your explanations, diagrams, and references. This tight feedback loop makes IJNBs ideal for learning, rapid prototyping, walkthroughs, and sharing ideas with teammates.
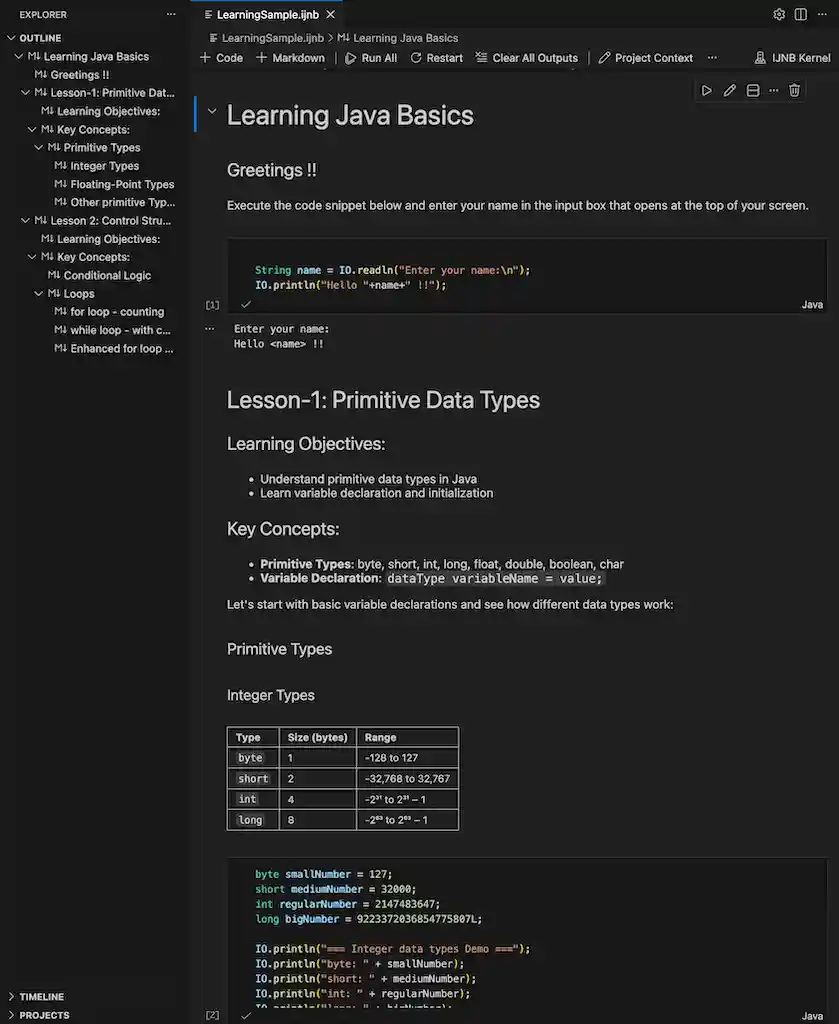
- Interactive Java Notebooks (IJNB) are documents that combine rich Markdown, executable Java code snippets, and the resulting outputs. Content is organized into distinct cells that you can interleave in any order.
- If you’ve used a REPL (read–eval–print loop) like JShell, notebooks take that idea further: you write a few lines of Java, run them immediately, and see the output inline — great for quick iteration on small chunks of code.
- Beyond being great REPLs, notebooks are also excellent storytelling tools. You can mix explanations, images, math, and code to communicate ideas to teammates or the broader community.
- While Jupyter is the most popular notebook format, primarily known for Python, it also supports other languages via kernels. A Java kernel, such as the Java extension's IJNB Kernel, lets you run Java code inside the same notebook experience. VS Code has native notebook support and can host Java notebooks through a compatible Java kernel and the standard notebook UI.
- Download some samples of Interactive Java Notebooks and open them in VS Code to get started.
Prerequisites
Before you begin, make sure your environment is ready. Having the right pieces in place ensures your first run is smooth, features are available, and errors are easier to diagnose. In most cases, you only need to set this up once per machine.
- VS Code installed, plus the Java extension for a better Java editing experience.
- A Java Development Kit (JDK) installed and configured in your VS Code settings.
- A Java kernel for notebooks (for example, the Java extension's IJNB Kernel).
- Workspace Trust: In Restricted Mode, you cannot run cells or see rich outputs. Trust the workspace to execute code safely.
Create or open a notebook (.ijnb)
Creating your first notebook is just a command away. You can start with a blank page or explore existing examples and adapt them to your needs. Either way, the process is quick and repeatable.
Create
Open
If you already have a notebook, opening it is just like any other file. Notebooks are portable and can live alongside your project code, examples, and documentation.
Use the File Explorer to open an existing .ijnb in VS Code.
If opening the file in another tool that doesn’t recognize .ijnb, you can temporarily rename to .ipynb for compatibility, then rename back after editing.
Note: Existing .ipynb notebooks with Jupyter notebook file format version 4.5 and above are supported in the extension. Older notebooks may easily be re-saved to a newer file format version in a Jupyter IDE using an upgraded version of the nbformat library.
Select the Java kernel
Every notebook runs through a kernel — the engine that executes your code. Selecting the Java kernel ensures your cells are compiled and run as Java, and that Java-specific features are enabled.
Work with code and Markdown cells
Notebooks let you move seamlessly between executable code and explanatory text. Use Markdown cells for narrative and structure; use code cells to try ideas, validate assumptions, and show results.
Add cells
Use the + Code or + Markdown buttons in the main toolbar or a cell's hover toolbar to add a code or markdown cell. This keeps your workflow lightweight — write a bit, run a bit, explain a bit.
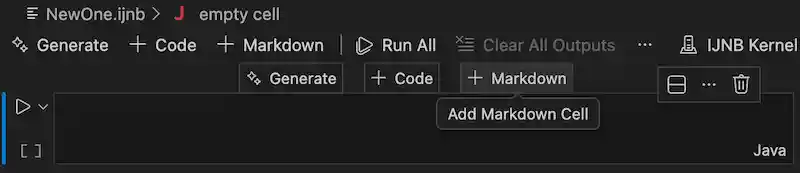
When in command mode i.e. non-editing mode, you may also press A (add above) or B (add below), to add a cell.
Cell modes
Switching between edit and command modes helps you alternate between typing content and manipulating cells. This mirrors common notebook workflows and keeps your hands on the keyboard.
- Press
Enterto switch to edit mode. - Press
Escto switch to command mode i.e. view mode. - The left-side bar indicates the cell’s state.
- Convert cell types: In command mode,
Mswitches to Markdown;Yswitches to code. - Render Markdown with the checkmark button in the cell toolbar, or, the shortcuts
Ctrl+EnterorShift+Enter.
Line numbers
Line numbers are useful for teaching, code reviews, and debugging small snippets. Toggle them when you need a bit more context.
Toggle display of line numbers per cell with the "Show Cell Line Numbers" command or cell toolbar menu.

Save
Frequent saves protect your work and preserve outputs for others to see exactly what you saw when you ran the notebook.
Save the file with Ctrl/Cmd+S or "File > Save".
Run cells
Running cells is the heart of the notebook experience. Execute a single step to test an idea, or run the entire document to reproduce a workflow end-to-end.
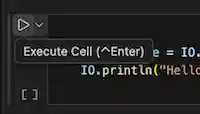
Run a cell
Click the Run icon to the left of a cell. This executes just the selected cell, leaving the rest untouched — perfect for iteration and focused debugging.
Shortcuts that may be used are:
-
Ctrl+Enterruns the current cell -
Shift+Enterruns and inserts a new cell below (focus moves) -
Alt/Option+Enterruns and inserts a new cell below (focus stays)
Run multiple cells
When you are ready to validate larger sections or the entire notebook, use the built-in actions to run sequences of cells.
Use Run All from the main toolbar, or, Run All Above, Run All Below from the cell toolbar to execute multiple code cells.

Stop execution
Sometimes a cell may take longer than expected, or you realize you need to adjust the code. You can safely interrupt execution without closing the notebook.
Go To execution
Large notebooks can have many cells. These navigation helpers make it easy to jump straight to what is currently running or where things last failed.
Use the Go To button in the main notebook toolbar to quickly navigate to the:
Navigate cells
As notebooks grow, it helps to organize, reorder, and quickly find content. VS Code provides multiple ways to keep things tidy and comprehensible.
Move and delete cells
- Drag the handle at the left of a cell to move it;
Alt/Option+Arrowalso moves selected cells. - Delete via the cell’s Delete icon or press
dd/Cmd+Backspacein command mode. - Undo with
z/Cmd+Z.
Sections and outline
Use headings to structure your narrative into logical sections. This improves readability and lets you operate on related groups of cells.
Search
When notebooks become long, search helps you quickly locate the right cell or text. You can scope your search to code, outputs, or Markdown depending on what you are looking for.
Use Ctrl/Cmd+F and filter to search Markdown input/output, code input, or cell outputs.
Run outputs and input
Outputs and inputs are integral to how notebooks communicate results and interact with users. VS Code keeps them close to the code that generated them, so it’s easy to connect cause and effect.
Output display
Outputs from running code cells are shown directly below each cell.
Persisting results
If you want others to see the same results you saw when running the notebook, save the file with outputs intact. This is especially useful for reviews, demos, and teaching.
Save the notebook (including outputs) with File > Save or Ctrl/Cmd+S. This stores both the code and the current outputs, so others see the same results when they open the file.
Clearing results
Sometimes you want to start fresh or reduce noise in version control. Clearing outputs removes the rendered results but leaves your code unchanged.
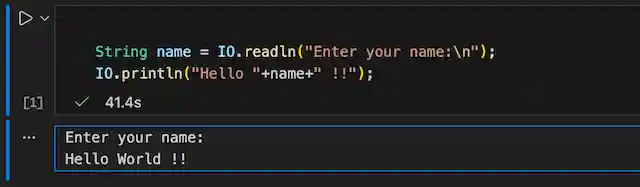
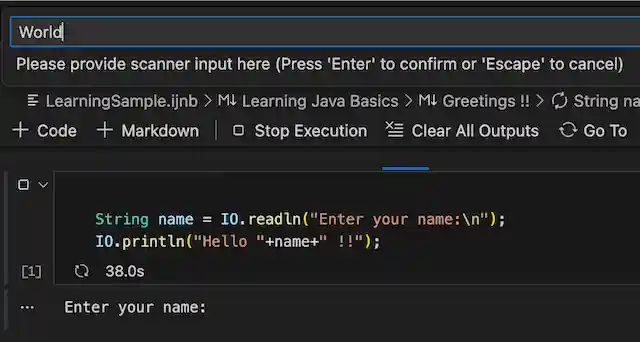
User input
Some examples prompt the user (e.g., reading from stdin). VS Code surfaces an input box so you can provide values without leaving the notebook.
If a code cell requires user input (for example, reading from stdin), an input box opens in the search bar at the top of VS Code when the cell runs. Type your input and press Enter to continue execution.
Share notebooks with others
Notebooks are portable artifacts you can commit to source control, attach to issues, or send to colleagues. You can also interoperate with tooling that prefers the classic Jupyter extension.
- You can share your notebooks (.ijnb files) with others, for use with the Oracle Java extension.
- To open your Java notebook in other IDEs such as Jupyter, save or rename the file extension from .ijnb to .ipynb.
- Most external tools expect the standard Jupyter extension.
- Tips:
- Consider clearing large outputs before sharing to reduce file size and avoid rendering issues in other tools.
- If recipients edit and return the file, you can rename it back to .ijnb for your workflow.
- Note: Existing .ipynb notebooks with Jupyter notebook file format version 4.5 and above are supported in the extension. Older notebooks may easily be re-saved to a newer file format version in a Jupyter IDE using an upgraded version of the nbformat library.
Project context: Notebooks within Java projects
When a notebook lives alongside your code, it can seamlessly reuse your project’s classes, dependencies, and settings. This tight coupling reduces boilerplate in your examples and makes notebooks excellent companions to your application code.
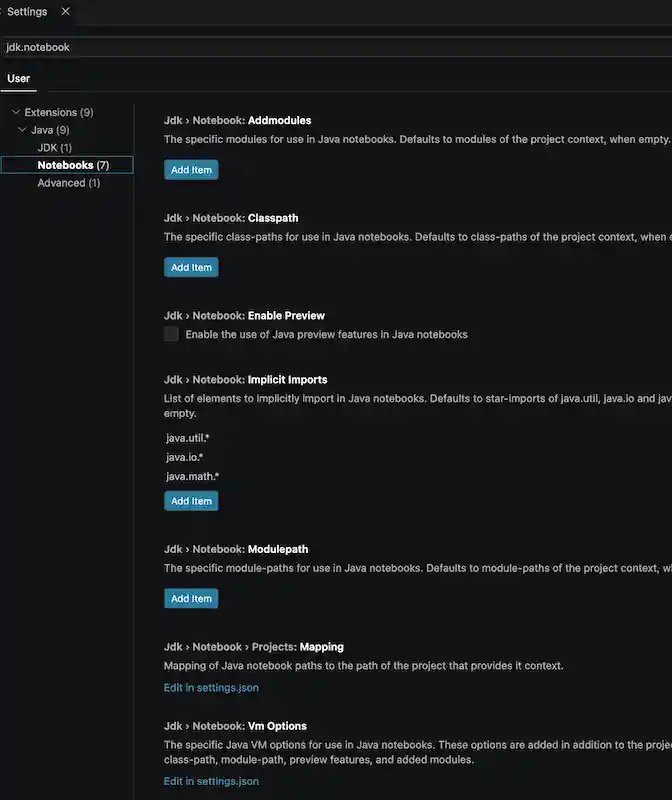
Java notebook configuration
You can tailor how notebooks resolve classes and modules, or enable advanced language features. These settings are helpful when examples need a slightly different setup than your project defaults, or when you want to standardize imports across a team. Configure them in your workspace or user settings (for example, .vscode/settings.json). These settings override any settings inferred from the project context.
-
Jdk › Notebook: Classpath (
jdk.notebook.classpath): The specific class-paths for use in Java notebooks. Defaults to class-paths of the project context, when empty. -
Jdk › Notebook: Modulepath (
jdk.notebook.modulepath): The specific module-paths for use in Java notebooks. Defaults to module-paths of the project context, when empty. -
Jdk › Notebook: Addmodules (
jdk.notebook.addmodules): The specific modules for use in Java notebooks. Defaults to modules of the project context, when empty. -
Jdk › Notebook: Enablepreview (
jdk.notebook.enablepreview): Enable the use of Java preview features in Java notebooks. -
Jdk › Notebook: Implicitimports (
jdk.notebook.implicitimports): List of elements to implicitly import in Java notebooks. Defaults to star-imports ofjava.util,java.ioandjava.mathpackages, when empty.