Advanced Installation
Before you begin, it is recommended to understand exactly how this project works. Knowing what is happening at each point will help you troubleshoot any issues far better. Check out the How does this all work? page.
Video tutorial
For a video tutorial, click here. You still need this written guide - the video is somewhat outdated, and it does not cover everything.
Table of Contents
- Advanced Installation
1. Builder
You can create a builder in one of two ways:
-
Use a Continuous Integration (CI) service such as GitHub Actions or Semaphore CI. This method is the easiest, fastest, and most recommended way to make a builder. Head over to SignTools-CI and follow the instructions.
-
Use your own Mac machine. This method is only recommended if you already have a server Mac, you are somewhat experienced in server management, and you would like to host your truly own builder. Go to SignTools-Builder for instructions.
Only one builder is necessary, but you can have more if needed. Once done, proceed below.
2. Web service configuration
It's easier if you use your personal computer for the initial configuration. This guide assumes you are doing that.
2.1. Configuration file
You need to create a configuration file which links the web service to your builder.
- Download the correct binary release for your computer
- Run it once - it will exit immediately, saying that it has generated a configuration file
- In the same folder as the binary, you will find a new file
signer-cfg.yml- open it with your favorite text editor and configure the settings using the explanations below. The lines that start with a hashtag#are comments, you do not need to touch them.
⚠️ Don't forget to set "
enable: true" on the builder that you are configuring!
# configure the builder(s) you created in the previous section
builder:
  # GitHub Actions
  github:
    enable: false
    # the name you gave your builder repository
    repo_name: SignTools-CI
    # your GitHub profile/organization name
    org_name: YOUR_ORG_NAME
    workflow_file_name: sign.yml
    # your GitHub personal access token that you created with the builder
    token: YOUR_GITHUB_TOKEN
    ref: master
  # Semaphore CI
  semaphore:
    enable: false
    # the name you gave to your Semaphore CI project
    project_name: YOUR_PROJECT_NAME
    # your Semaphore CI profile/organization name
    org_name: YOUR_ORG_NAME
    # your Semaphore CI token that you got when creating the builder
    token: YOUR_SEMAPHORE_TOKEN
    ref: refs/heads/master
    secret_name: ios-signer
  # your own self-hosted Mac builder
  selfhosted:
    enable: false
    # the url of your builder
    url: http://192.168.1.133:8090
    # the auth key you used when you started the builder
    key: SOME_SECRET_KEY
# the base url used by the builder to reach this server
# leave empty if using a tunnel provider, it will set this automatically
server_url: https://mywebsite.com
# whether to redirect all http requests to https
redirect_https: false
# where to save data like apps and signing profiles
save_dir: data
# how often does the cleanup job run
cleanup_interval_mins: 1
# apps that have been processing for more than this time will be marked as failed
sign_timeout_mins: 15
# this protects the web ui with a username and password
# definitely enable it if you are using a tunnel provider
basic_auth:
  enable: false
  username: "admin"
  # don't forget to change the password
  password: "admin"
2.2. Signing profile
You need a signing profile to be able to sign apps. A signing profile is simply a collection of files and credentials that Apple provides to developers so they can sign apps.
There are two types of signing profiles:
-
Developer account
This method works for both free and paid developer accounts. You only need your Apple account's name and password. You will likely be prompted for a 6-digit code every time you sign an app, which you can submit on the service's web page. This method will be able to use most entitlements, resulting in working app extensions and iCloud synchronization. There are no restrictions if you have a paid account. If you have a free account, make sure you read and understand the limitations in the FAQ page.
-
Custom provisioning profile
If you have a provisioning profile with a
.mobileprovisionextension, you can use this method as well. There is no 6-digit code, so signing will be faster than a developer account. However, based on the type of your provisioning profile, different entitlements and features may not work on your signed apps. For the differences, check the FAQ page.
Additionally, you will also need a certificate archive with a .p12 extension. It must contain at least one certificate and at least one private key. You can either use an Apple Development certificate, or both Apple Development and Apple Distribution if you want to use production entitlements. For the differences, check the FAQ page.
If you are using a custom provisioning profile, you likely received a certificate archive along with it - use that. If you have a developer account, you can create one from the developer portal. Otherwise, follow the instructions below:
-
macOS
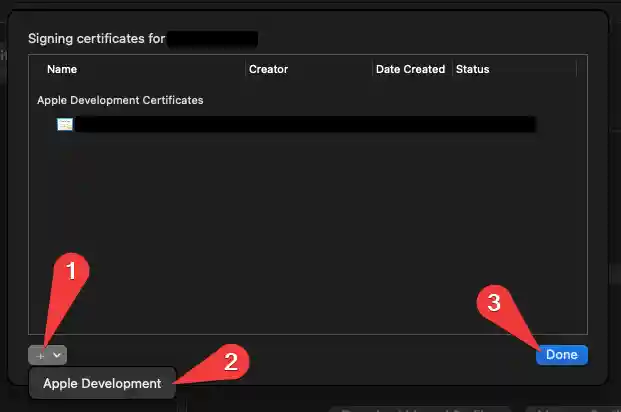
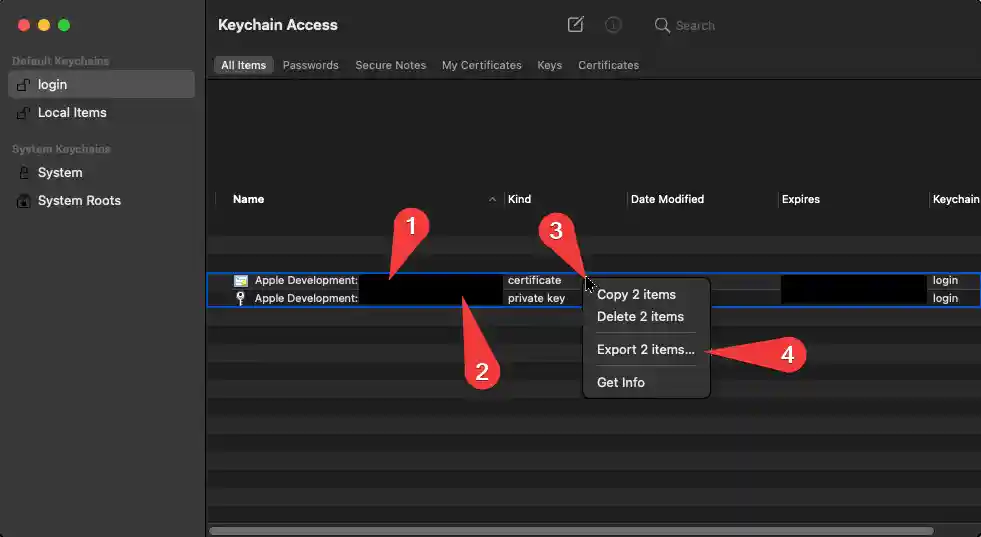
Install Xcode and open the
Account Preferences(A). Sign into your account using the plus button. Select your account and click onManage Certificates.... In the new window (B), click the plus button and thenApple Development. ClickDone. Now open theKeychainapp (C). There you will find your certificate and private key. Select them by holdingCommand, then right-click and selectExport 2 items.... This will export you the.p12file you need.A B C 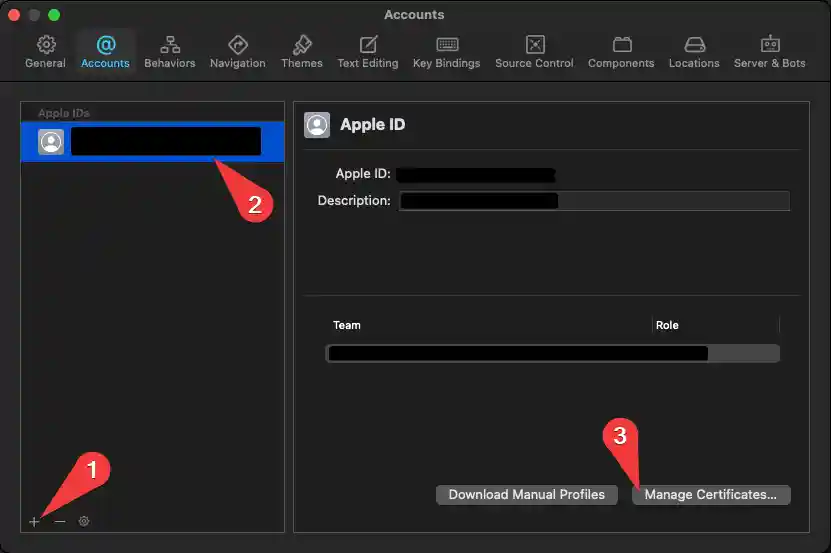
-
Windows
There is no official way to do this. However, you can use altserver-cert-dumper with AltStore as a workaround. Note that you are doing so at your own risk.


Once you have your signing profile, you need to create the correct folders for the service to read it:
- Create a new folder named
data(if you changedsave_dirin the config above, use that) - Create another folder named
profilesinside of it - Create a new folder named
my_profileinside ofprofiles. You can use any profile name here, this will be the ID of your signing profile - Put the signing related files inside here. Read ahead to see what they should be named
- Repeat the steps above for each signing profile that you want to add
⚠️ You need to match the files names exactly as they are shown below. For an example, your certificate archive must be named exactly
cert.p12. Be aware that Windows may hide the extensions by default.
-
Developer account
data
|____profiles
| |____my_profile                # Or what you named your profile
| | |____cert.p12                # the signing certificate archive
| | |____cert_pass.txt           # the signing certificate archive's password
| | |____name.txt                # a name to show in the web interface
| | |____account_name.txt        # the developer account's name (email)
| | |____account_pass.txt        # the developer account's password
| |____my_other_profile
| | |____...
-
Custom provisioning profile
data
|____profiles
| |____my_profile                # any unique string that you want
| | |____cert.p12                # the signing certificate archive
| | |____cert_pass.txt           # the signing certificate archive's password
| | |____name.txt                # a name to show in the web interface
| | |____prov.mobileprovision    # the signing provisioning profile
| |____my_other_profile
| | |____...
That's all the initial configuration! To recap, you now have the following configuration files:
datafolder (or whatever you named it insave_dirin the config)signer-cfg.ymlfile
3. Web service installation
3.1. Self-hosting on computer or server
3.1.1. Installing
You have two options:
Normal
- Download the correct binary release (if this is a different computer than you used before)
- Move the configuration files you made in sections
2.1.and2.2.of this guide to the same folder as the binary you just downloaded
Docker
- Use the official Docker image
- Move and mount the configuration files from sections
2.1.and2.2.:./signer-cfg.yml:/signer-cfg.yml./data:/data(or whatever you set insave_dir)
3.1.2. Running
For reference, these are the default arguments that will be used:
- The listening port is 8080. You can change this with the argument
-port 1234 - The listening host is all (0.0.0.0). You can change this with the argument
-host 1.2.3.4 - For more, use
-help
The web service cannot work by itself. You have two options:
Reverse proxy - secure, fast, reliable, but harder to set up
- Requires publicly accessible port 443 (HTTPS)
- Requires domain with valid HTTPS certificate
- Requires manual configuration of reverse proxy with your own authentication
- Don't protect the following endpoints:
where
/apps/:id/ /jobs /jobs/:id:idis a wildcard parameter.
Tunnel provider - less secure, slower, but quick and easy to set up
ngrok and Cloudflare Argo are supported as tunnel providers. The latter will be demonstrated in this guide. Run the signer service with -help to see alternative details.
- Download the correct cloudflared binary for your computer.
- Every time before starting your service, execute the following command and keep it running:
cloudflared tunnel -url http://localhost:8080 -metrics localhost:51881
- Then start your service with the following command:
SignTools -cloudflared-port 51881
- When the service finishes loading, look for a line similar to this:
11:51PM INF using server url url=https://aids-woman-zum-summer.trycloudflare.comhttps://xxxxxxxxxxxx.trycloudflare.comis the public address of your service. That's what you want to open in your browser. If you want faster transfer speeds, you can also use the LAN or localhost IP address. Congratulations!
3.2. Self-hosting on phone
It is highly discouraged to use this method unless you absolutely need to. There are a lot of limitations and weird quirks, and signing will be very slow.
3.2.1. Preparing
- Get the iSH app on your phone. Open the app, and when text appears, close it.
- Move the configuration files you made in sections
2.1.and2.2.of this guide to your phone. You can use any method, like iTunes or iMazing. It doesn't matter where you put the files as long as you can access them from the Files app on your phone. - Open the Files app on your phone.
- Swipe to the right until you go to the
Browsescreen. - In the top-right corner, click on the three dots and select
Edit. - Enable (toggle) the
iSHentry underLocations. - Move the files you just copied from your computer to the
iSHlocation you just enabled, inside the folderroot. - Open the
iSHapp again. - Type
lsand press enter. If you did everything correctly, you should see the names of the files you just moved in. - Type
apk add curland press enter.
3.2.2. Installing
- Type the following command and press enter:
curl -sL git.io/ios-signer-ish | sh
3.2.3. Running
-
Type the following command and press enter:
⚠️ When iOS asks you to grant location permission to iSH, click "Always Allow". The location data is not used for anything, but the permission allows the service to keep running in the background if you minimize iSH or lock your phone.
-
When the service finishes loading, look for a line similar to this:
11:51PM INF using server url url=https://aids-woman-zum-summer.trycloudflare.comhttps://xxxxxxxxxxxx.trycloudflare.comis the public address of your service. That's what you want to open in your browser. If you want faster transfer speeds, you can also use the LAN or localhost IP address. Congratulations!Due to Apple's strict background process policy, iSH will get killed if it uses more than "80% cpu over 60 seconds". This can break any part of the service. To make sure it doesn't happen:
⚠️ Use Safari browser. Whenever you are waiting for something to complete, such as app upload, signing, or installation, open iSH in the foreground. Safari will continue in the background.
Watch the logs to know when the operation is complete. You can periodically switch between Safari and iSH to check as well, just don't leave iSH in the background for more than 30 seconds.
3.2.4. Updating
Just repeat the Installing section.