
This is a fork of the UImGui project by psydack with several improvements I've made for my own needs and which I may continue to develop in the future. Tested on Unity 6 LTS and Unity 2022 LTS.
Key Differences from Original UImGui
- Android build support and touchscreen functionality (Input System only)
- Dedicated VR mode with the ability to render ImGui in 3D space
- Improved atlas and font rendering for VR (can be further optimized)
- Full RenderGraph implementation for URP and Unity 6
- Removed support for IMPlot, IMGizmo, and IMNodes (these require significant work, but aren't essential for my use case)
- macOS / Apple Silicon support and various changes from charlietran's fork
What Needs Testing
- Built-in RP and HDRP functionality
- macOS / Apple Silicon compatibility
- Performance impact
Future Development Goals
- Ability to zoom in/out on windows in VR space
- Better head following and positioning for VR mode
- Ability to pin text-only informational windows so they remain visible even after exiting VR mode.
- More precise control over element sizing
- Improved GUI activation architecture and UImGUI.cs script workflow
- Remove static events
- iOS build support
Original UImGui
UImGui (Unity ImGui) is a package for the immediate mode GUI library using ImGui.NET. This project is based on the RG.ImGui project and uses FreeType as the default renderer.
Using ImGui 1.90.1
What is Dear ImGui?
Dear ImGui is a bloat-free graphical user interface library for C++. It outputs optimized vertex buffers that you can render anytime in your 3D-pipeline enabled application. It is fast, portable, renderer agnostic and self-contained (no external dependencies).
Dear ImGui is designed to enable fast iterations and to empower programmers to create content creation tools and visualization / debug tools (as opposed to UI for the average end-user). It favors simplicity and productivity toward this goal, and lacks certain features normally found in more high-level libraries.
Installation & Setup
- Add package from git URL:
https://github.com/ycatdev/uimgui-extended.git - Add the
UImGuicomponent to your scene - (Optional) Set
Platform TypetoInput Systemand add theSampleDemoWindowobject to the scene - For URP: See Using URP section
- For HDRP: See Using HDRP section
- For Built-in RP: See Using Built-in section
- For VR Mode: Add the
ImGUI-VRBaseprefab from thePrefabsfolder to your scene. For more info seeVR Mode Input Bindingsbelow. Also you need to addShowDemoWindowscript somewhere on your scene, if you still do not have own ImGui code and want just to test it. - You're ready! Check the Samples section for usage examples
VR Mode Input Bindings
To enter/exit VR mode, hold down the Thumbstick on either controller for 2 seconds. This can be changed in the SimpleImGUIActivator script located in the ImGUI-VRBase prefab on the Activator object.
In the UImGui script, if you set Render Type to VR Mesh and Platform Type to VR Input, a new VR mode settings block will appear. Here you can specify which controller acts as the cursor using the Hand Cursor Mode parameter.
Currently, VR mode is designed so that the controllers share two roles between them: Cursor and Navigator. The cursor is the controller specified in Hand Cursor Mode, which emulates the mouse:
- Raycast position - Mouse Position
- Trigger - Mouse Left Click
- Grab/Grip - Mouse Right Click
- Thumbstick - UI Scroll
The second controller acts as the navigator and emulates a gamepad:
- Thumbstick - Directional navigation (same as Thumbstick/DPad on a real gamepad)
- Primary button - A / Cross button on a real gamepad
- Secondary button - B / Circle button on a real gamepad
Controller Transform Calculation
VR mode needs to calculate controller positions, and for convenience, their positions should always match the player's actual controllers. VR mode provides a parameter that describes how to calculate controller transforms:
-
CalculateFromInputSystem - This method calculates position relative to Tracking Space using raw input from the Input System. This method is suitable if your VR rig is built on the standard
XR Origin. When using this method, you need to assign a Transform to theTracking Spacevariable. This is typically the root object containing the camera, such asCamera OffsetorXR Origin. -
TransformsMirroring - This method copies the position and rotation from an object that represents the controller's position within the game. This approach is needed for custom VR Rigs and unique locomotion systems, where additional variables beyond Tracking Space need to be calculated. When using this method, you need to assign your Transform for each controller to the
rightControllerMirrorTransformandleftControllerMirrorTransformvariables.
Building Dear ImGui
If you want to build a new version of Dear ImGui, refer to my repository with Android support and the original Psydack repositories: ImGui.NET and ImGui.NET-nativebuild.
Samples
A demo script called ShowDemoWindow is included in the UImGui/Sample folder.
You can subscribe to the global layout or to a specific UImGui context. If using the global approach, remember to set Do Global Events to true on the UImGui instance.
Global Event Subscription
using UImGui;
using UnityEngine;

public class StaticSample : MonoBehaviour
{
	private void Awake()
	{
		UImGuiUtility.Layout += OnLayout;
		UImGuiUtility.OnInitialize += OnInitialize;
		UImGuiUtility.OnDeinitialize += OnDeinitialize;
	}

	private void OnLayout(UImGui.UImGui obj)
	{
		// Unity Update method.
		// Your code belongs here! Like ImGui.Begin... etc.
	}

	private void OnInitialize(UImGui.UImGui obj)
	{
		// Runs after UImGui.OnEnable();
	}

	private void OnDeinitialize(UImGui.UImGui obj)
	{
		// Runs after UImGui.OnDisable();
	}

	private void OnDisable()
	{
		UImGuiUtility.Layout -= OnLayout;
		UImGuiUtility.OnInitialize -= OnInitialize;
		UImGuiUtility.OnDeinitialize -= OnDeinitialize;
	}
}
Instance-Based Subscription
using UnityEngine;

public class InstanceSample : MonoBehaviour
{
	[SerializeField]
	private UImGui.UImGui _uimGuiInstance;

	private void Awake()
	{
		if (_uimGuiInstance == null)
		{
			Debug.LogError("Must assign a UImGuiInstance or use UImGuiUtility with Do Global Events on UImGui component.");
		}

		_uimGuiInstance.Layout += OnLayout;
		_uimGuiInstance.OnInitialize += OnInitialize;
		_uimGuiInstance.OnDeinitialize += OnDeinitialize;
	}

	private void OnLayout(UImGui.UImGui obj)
	{
		// Unity Update method.
		// Your code belongs here! Like ImGui.Begin... etc.
	}

	private void OnInitialize(UImGui.UImGui obj)
	{
		// Runs after UImGui.OnEnable();
	}

	private void OnDeinitialize(UImGui.UImGui obj)
	{
		// Runs after UImGui.OnDisable();
	}

	private void OnDisable()
	{
		_uimGuiInstance.Layout -= OnLayout;
		_uimGuiInstance.OnInitialize -= OnInitialize;
		_uimGuiInstance.OnDeinitialize -= OnDeinitialize;
	}
}
Basic UI Sample
[SerializeField]
private float _sliderFloatValue = 1;

[SerializeField]
private string _inputText;

// Add listeners, etc ...

private void OnLayout(UImGui.UImGui obj)
{
	ImGui.Text($"Hello, world {123}");
	if (ImGui.Button("Save"))
	{
		Debug.Log("Save");
	}

	ImGui.InputText("string", ref _inputText, 100);
	ImGui.SliderFloat("float", ref _sliderFloatValue, 0.0f, 1.0f);
}

Window with Menu Bar Sample
[SerializeField]
private Vector4 _myColor;
private bool _isOpen;

private void OnLayout(UImGui.UImGui obj)
{
	// Create a window called "My First Tool", with a menu bar.
	ImGui.Begin("My First Tool", ref _isOpen, ImGuiWindowFlags.MenuBar);
	if (ImGui.BeginMenuBar())
	{
		if (ImGui.BeginMenu("File"))
		{
			if (ImGui.MenuItem("Open..", "Ctrl+O")) { /* Do stuff */ }
			if (ImGui.MenuItem("Save", "Ctrl+S")) { /* Do stuff */ }
			if (ImGui.MenuItem("Close", "Ctrl+W")) { _isOpen = false; }
			ImGui.EndMenu();
		}
		ImGui.EndMenuBar();
	}

	// Edit a color (stored as ~4 floats)
	ImGui.ColorEdit4("Color", ref _myColor);

	// Plot some values
	float[] my_values = new float[] { 0.2f, 0.1f, 1.0f, 0.5f, 0.9f, 2.2f };
	ImGui.PlotLines("Frame Times", ref my_values[0], my_values.Length);

	// Display contents in a scrolling region
	ImGui.TextColored(new Vector4(1, 1, 0, 1), "Important Stuff");
	ImGui.BeginChild("Scrolling");
	for (int n = 0; n < 50; n++)
		ImGui.Text($"{n}: Some text");
	ImGui.EndChild();
	ImGui.End();
}

Image Display Sample
[SerializeField]
private Texture _sampleTexture;

private void OnLayout(UImGui.UImGui obj)
{
	if (ImGui.Begin("Image Sample"))
	{
		System.IntPtr id = UImGuiUtility.GetTextureId(_sampleTexture);
		Vector2 size = new Vector2(_sampleTexture.width, _sampleTexture.height);
		ImGui.Image(id, size);

		ImGui.End();
	}
}

Custom UserData Sample
[Serializable]
private struct UserData
{
	public int SomeCoolValue;
}

[SerializeField]
private UserData _userData;
private string _input = "";

// Add Listeners... etc.

private unsafe void OnInitialize(UImGui.UImGui uimgui)
{
	fixed (UserData* ptr = &_userData)
	{
		uimgui.SetUserData((IntPtr)ptr);
	}
}

private unsafe void OnLayout(UImGui.UImGui obj)
{
	if (ImGui.Begin("Custom UserData"))
	{
		fixed (UserData* ptr = &_userData)
		{
			ImGuiInputTextCallback customCallback = CustomCallback;
			ImGui.InputText("label", ref _input, 100, ~(ImGuiInputTextFlags)0, customCallback, (IntPtr)ptr);
		}

		ImGui.End();
	}
}

private unsafe int CustomCallback(ImGuiInputTextCallbackData* data)
{
	IntPtr userDataPtr = (IntPtr)data->UserData;
	if (userDataPtr != IntPtr.Zero)
	{
		UserData userData = Marshal.PtrToStructure<UserData>(userDataPtr);
		Debug.Log(userData.SomeCoolValue);
	}

	// You must overwrite how you handle new inputs.
	// ...

	return 1;
}

Custom Fonts
Thanks
Check here for more information
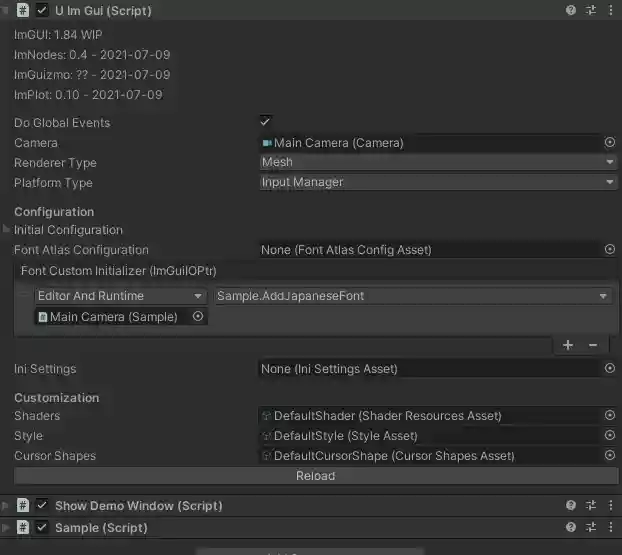
Adding Custom Fonts
Create a method with ImGuiIOPtr like this:
public void AddJapaneseFont(ImGuiIOPtr io)
{
	// You can put the font in StreamingAssetsFolder and load it like:
	// string fontPath = $"{Application.streamingAssetsPath}/NotoSansCJKjp-Medium.otf";
	string fontPath = "D:\\Users\\rofli.souza\\Desktop\\NotoSansCJKjp-Medium.otf";
	io.Fonts.AddFontFromFileTTF(fontPath, 18, null, io.Fonts.GetGlyphRangesJapanese());

	// You can create configs and customize further:
	// ImFontConfig fontConfig = default;
	// ImFontConfigPtr fontConfigPtr = new ImFontConfigPtr(&fontConfig);
	// fontConfigPtr.MergeMode = true;
	// io.Fonts.AddFontDefault(fontConfigPtr);
	// int[] icons = { 0xf000, 0xf3ff, 0 };
	// fixed (void* iconsPtr = icons)
	// {
	//     io.Fonts.AddFontFromFileTTF("fontawesome-webfont.ttf", 18.0f, fontConfigPtr, (System.IntPtr)iconsPtr);
	// }
}
-
Assign the object containing this method to the UImGui script component
-
Test with custom text:

if (ImGui.Begin("ウィンドウテスト"))
{
	ImGui.Text("こんにちは!テスト");
	ImGui.End();
}

You can see more samples here.
Custom Font Bootstrap
The project includes a CustomFontBootstrap script that uses a CustomFontByteData ScriptableObject as a font source and allows you to configure various font settings. You can examine this script in the ImGUI-VRBase/FontBootstrap prefab.
Render Pipeline Configuration
Using URP
- Add a
Render Im Gui Featurerender feature to your renderer asset - Assign it to the
render featurefield of the UImGui component - Check this issue for a detailed step-by-step guide
Using HDRP
When using the High Definition Render Pipeline:
- Add a
Custom Pass Volumecomponent anywhere in your scene - Add
DearImGuiPassto it - Set the Injection Point to before or after post processing
For more details, see the Unity documentation
Using Built-in
No special configuration required.
Known Issues
Issue: If you're already using System.Runtime.CompilerServices.Unsafe.dll, you may encounter the error: Multiple precompiled assemblies with the same name System.Runtime.CompilerServices.Unsafe.dll included for the current platform. Only one assembly with the same name is allowed per platform.
Resolution: Add UIMGUI_REMOVE_UNSAFE_DLL to Project Settings > Player > Other Settings > Scripting Define Symbols > Apply > Restart Unity Editor.
Issue: Font atlas crash. There's no fix. Use the callback method for custom fonts instead, or use CustomFontBootstrap.
Issue: If you frequintly enable and disable UImGui component, you may encounter a random crash related to texture resources not being loaded properly.
Android: If you get an error in an Android build indicating that the cimgui library could not be loaded, make sure to verify the import settings of the libraries located at uimgui-extended\Plugins\imgui\android. Each folder corresponding to an ABI must be marked for Android and configured for the correct target architecture.
Credits
- Psydack and the original UImGui repo
- Original repo: https://github.com/realgamessoftware/dear-imgui-unity
- Thanks to @lacrc and @airtonmotoki for their encouragement
- https://www.conventionalcommits.org/en/v1.0.0/
- https://semver.org/
- https://github.com/yeyushengfan258/Lyra-Cursors
- https://github.com/lob/generate-changelog
- https://github.com/notofonts
License
Dear ImGui is licensed under the MIT License. See LICENSE.txt for more information.