Sending and Receiving Messages Using a Simple Web Application
This section assumes that you are familiar with the basics of JavaServer Faces technology, described in Part IX, "The Web Tier."
The example, websimplemessage, is under the
_tut-install_/jms/examples/ directory. It uses sending and receiving
Facelets pages as well as corresponding backing beans. When a user
enters a message in the text field of the sending page and clicks a
button, the backing bean for the page sends the message to a queue and
displays it on the page. When the user goes to the receiving page and
clicks another button, the backing bean for that page receives the
message synchronously and displays it.
Figure 49-2 The websimplemessage Application
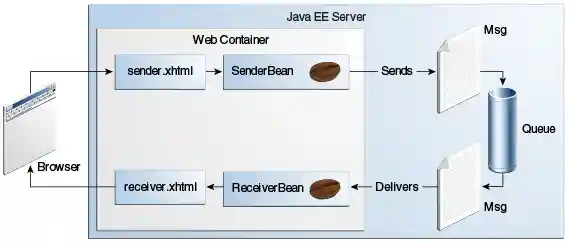
The websimplemessage Facelets Pages
The Facelets pages for the example are as follows.
-
sender.xhtml, which provides a labeledh:InputTexttag where the user enters the message, along with two command buttons. When the user clicks the Send Message button, thesenderBean.sendMessagemethod is called to send the message to the queue and display its contents. When the user clicks the Go to Receive Page button, thereceiver.xhtmlpage appears. -
receiver.xhtml, which also provides two command buttons. When the user clicks the Receive Message button, thereceiverBean.getMessagemethod is called to fetch the message from the queue and display its contents. When the user clicks the Send Another Message button, the sender.xhtml page appears again.
The websimplemessage Managed Beans
The two managed beans for the example are as follows.
-
SenderBean.java, a CDI managed bean with one property,messageText, and one business method,sendMessage. The class is annotated with@JMSDestinationDefinitionto create a component-private queue:@JMSDestinationDefinition( name = "java:comp/jms/webappQueue", interfaceName = "javax.jms.Queue", destinationName = "PhysicalWebappQueue") @Named @RequestScoped public class SenderBean {The
sendMessagemethod injects aJMSContext(using the default connection factory) and the queue, creates a producer, sends the message the user typed on the Facelets page, and creates aFacesMessageto display on the Facelets page:@Inject private JMSContext context; @Resource(lookup = "java:comp/jms/webappQueue") private Queue queue; private String messageText; ... public void sendMessage() { try { String text = "Message from producer: " + messageText; context.createProducer().send(queue, text); FacesMessage facesMessage = new FacesMessage("Sent message: " + text); FacesContext.getCurrentInstance().addMessage(null, facesMessage); } catch (Throwable t) { logger.log(Level.SEVERE, "SenderBean.sendMessage: Exception: {0}", t.toString()); } } -
ReceiverBean.java, a CDI managed bean with one business method,getMessage. The method injects aJMSContext(using the default connection factory) and the queue that was defined inSenderBean, creates a consumer, receives the message, and creates aFacesMessageto display on the Facelets page:@Inject private JMSContext context; @Resource(lookup = "java:comp/jms/webappQueue") private Queue queue; ... public void getMessage() { try { JMSConsumer receiver = context.createConsumer(queue); String text = receiver.receiveBody(String.class); if (text != null) { FacesMessage facesMessage = new FacesMessage("Reading message: " + text); FacesContext.getCurrentInstance().addMessage(null, facesMessage); } else { FacesMessage facesMessage = new FacesMessage("No message received after 1 second"); FacesContext.getCurrentInstance().addMessage(null, facesMessage); } } catch (Throwable t) { logger.log(Level.SEVERE, "ReceiverBean.getMessage: Exception: {0}", t.toString()); } }
Running the websimplemessage Example
You can use either NetBeans IDE or Maven to build, package, deploy, and
run the websimplemessage application.
The following topics are addressed here:
Creating Resources for the websimplemessage Example
This example uses an annotation-defined queue and the preconfigured
default connection factory java:comp/DefaultJMSConnectionFactory.
To Package and Deploy websimplemessage Using NetBeans IDE
-
Make sure that GlassFish Server has been started (see Starting and Stopping GlassFish Server).
-
From the File menu, choose Open Project.
-
In the Open Project dialog box, navigate to:
-
Select the
websimplemessagefolder. -
Click Open Project.
-
In the Projects tab, right-click the
websimplemessageproject and select Build.This command builds and deploys the project.
To Package and Deploy websimplemessage Using Maven
-
Make sure that GlassFish Server has been started (see Starting and Stopping GlassFish Server).
-
In a terminal window, go to:
tut-install/examples/jms/websimplemessage/ -
To compile the source files and package and deploy the application, use the following command:
To Run the websimplemessage Example
-
In a web browser, enter the following URL:
http://localhost:8080/websimplemessage -
Enter a message in the text field and click Send Message.
If, for example, you enter "Hello, Duke", the following appears below the buttons:
Sent message: Message from producer: Hello, Duke -
Click Go to Receive Page.
-
Click Receive Message.
The following appears below the buttons:
Reading message: Message from producer: Hello, Duke -
Click Send Another Message to return to the sending page.
-
After you have finished running the application, undeploy it using either the Services tab of NetBeans IDE or the
mvn cargo:undeploycommand.