Receiving Messages Asynchronously Using a Message-Driven Bean
If you are writing an application to run in the Java EE application
client container or on the Java SE platform, and you want to receive
messages asynchronously, you need to define a class that implements the
MessageListener interface, create a JMSConsumer, and call the method
setMessageListener.
If you’re writing an application to run in the Java EE web or EJB
container and want it to receive messages asynchronously, you also need
to need to define a class that implements the MessageListener
interface. However, instead of creating a JMSConsumer and calling the
method setMessageListener, you must configure your message listener
class to be a message-driven bean. The application server will then take
care of the rest.
Message-driven beans can implement any messaging type. Most commonly, however, they implement the Java Message Service (JMS) technology.
Overview of the simplemessage Example
The simplemessage application has the following components:
-
SimpleMessageClient: An application client that sends several messages to a queue -
SimpleMessageBean: A message-driven bean that asynchronously processes the messages that are sent to the queue
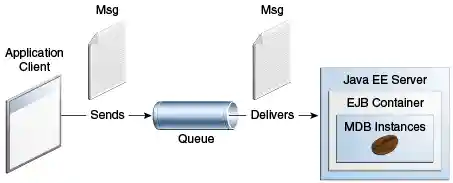
Figure 49-3 illustrates the structure of this application. The application client sends messages to the queue, which was created administratively using the Administration Console. The JMS provider (in this case, GlassFish Server) delivers the messages to the instances of the message-driven bean, which then processes the messages.
Figure 49-3 The simplemessage Application
The source code for this application is in the tut-install`/examples/jms/simplemessage/` directory.
The simplemessage Application Client
The SimpleMessageClient sends messages to the queue that the
SimpleMessageBean listens to. The client starts by injecting the
connection factory and queue resources:
@Resource(lookup = "java:comp/DefaultJMSConnectionFactory")
private static ConnectionFactory connectionFactory;

@Resource(lookup = "jms/MyQueue")
private static Queue queue;
Next, the client creates the JMSContext in a try-with-resources
block:
String text;
final int NUM_MSGS = 3;

try (JMSContext context = connectionFactory.createContext();) {
Finally, the client sends several text messages to the queue:
for (int i = 0; i < NUM_MSGS; i++) {
    text = "This is message " + (i + 1);
    System.out.println("Sending message: " + text);
    context.createProducer().send(queue, text);
}
The simplemessage Message-Driven Bean Class
The first few lines of the SimpleMessageBean class use the
@MessageDriven annotation’s activationConfig attribute to specify
configuration properties:
@MessageDriven(activationConfig = {
    @ActivationConfigProperty(propertyName = "destinationLookup",
            propertyValue = "jms/MyQueue"),
    @ActivationConfigProperty(propertyName = "destinationType",
            propertyValue = "javax.jms.Queue")
})
See Table 48-3 for a list of the available properties.
The onMessage Method
When the queue receives a message, the EJB container invokes the message
listener method or methods. For a bean that uses JMS, this is the
onMessage method of the MessageListener interface.
In the SimpleMessageBean class, the onMessage method casts the
incoming message to a TextMessage and displays the text:
public void onMessage(Message inMessage) {

    try {
        if (inMessage instanceof TextMessage) {
            logger.log(Level.INFO,
                    "MESSAGE BEAN: Message received: {0}",
                    inMessage.getBody(String.class));
        } else {
            logger.log(Level.WARNING,
                    "Message of wrong type: {0}",
                    inMessage.getClass().getName());
        }
    } catch (JMSException e) {
        logger.log(Level.SEVERE,
                "SimpleMessageBean.onMessage: JMSException: {0}",
                e.toString());
        mdc.setRollbackOnly();
    }
}
Running the simplemessage Example
You can use either NetBeans IDE or Maven to build, deploy, and run the
simplemessage example.
The following topics are addressed here:
Creating Resources for the simplemessage Example
This example uses the queue named jms/MyQueue and the preconfigured
default connection factory java:comp/DefaultJMSConnectionFactory.
To Run the simplemessage Example Using NetBeans IDE
-
Make sure that GlassFish Server has been started (see Starting and Stopping GlassFish Server).
-
From the File menu, choose Open Project.
-
In the Open Project dialog box, navigate to:
tut-install/examples/jms/simplemessage -
Select the
simplemessagefolder. -
Make sure that the Open Required Projects check box is selected, then click Open Project.
-
In the Projects tab, right-click the
simplemessageproject and select Build. (If NetBeans IDE suggests that you run a priming build, click the box to do so.)This command packages the application client and the message-driven bean, then creates a file named
simplemessage.earin thesimplemessage-ear/target/directory. It then deploys thesimplemessage-earmodule, retrieves the client stubs, and runs the application client.The output in the output window looks like this (preceded by application client container output):
Sending message: This is message 1
Sending message: This is message 2
Sending message: This is message 3
To see if the bean received the messages,
 check <install_dir>/domains/domain1/logs/server.log.
In the server log file, lines similar to the following appear:
MESSAGE BEAN: Message received: This is message 1
MESSAGE BEAN: Message received: This is message 2
MESSAGE BEAN: Message received: This is message 3
The received messages may appear in a different order from the order in which they were sent.
-
After you have finished running the application, undeploy it using the Services tab.
To Run the simplemessage Example Using Maven
-
Make sure that GlassFish Server has been started (see Starting and Stopping GlassFish Server).
-
In a terminal window, go to:
tut-install/examples/jms/simplemessage/ -
To compile the source files and package the application, use the following command:
This target packages the application client and the message-driven bean, then creates a file named
simplemessage.earin thesimplemessage-ear/target/directory. It then deploys thesimplemessage-earmodule, retrieves the client stubs, and runs the application client.The output in the terminal window looks like this (preceded by application client container output):
Sending message: This is message 1
Sending message: This is message 2
Sending message: This is message 3
To see if the bean received the messages,
 check <install_dir>/domains/domain1/logs/server.log.
In the server log file, lines similar to the following appear:
MESSAGE BEAN: Message received: This is message 1
MESSAGE BEAN: Message received: This is message 2
MESSAGE BEAN: Message received: This is message 3
The received messages may appear in a different order from the order in which they were sent.
-
After you have finished running the application, undeploy it using the
mvn cargo:undeploycommand.